Fakamatala
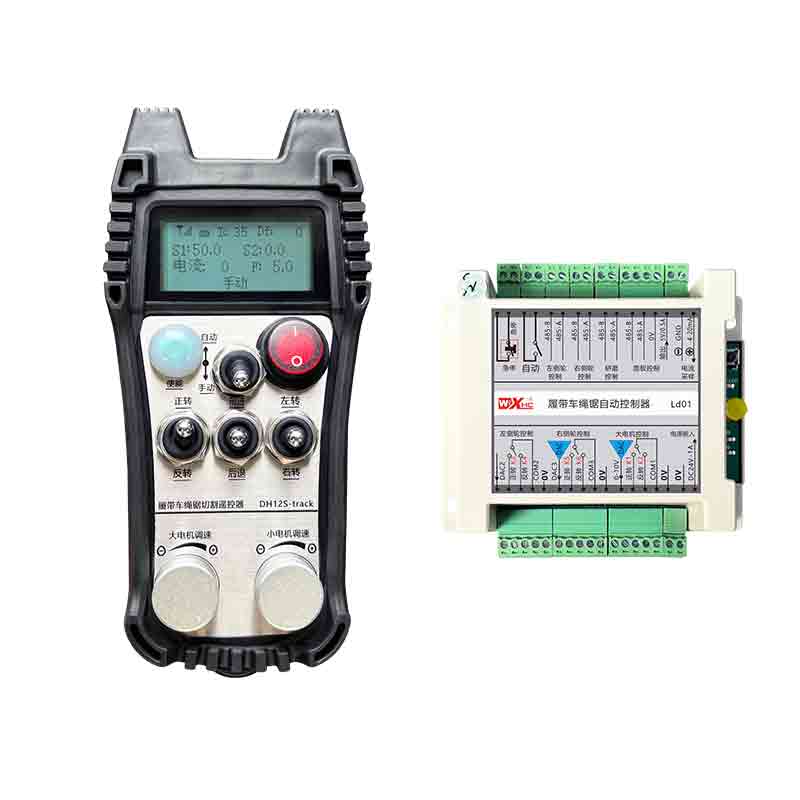
sipinga 'o e koloa
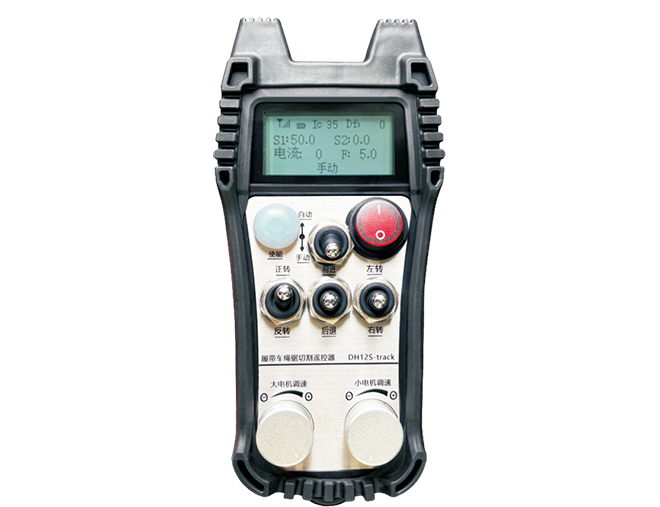
Motolo: DH12S-LD
Ngaahi me'angaue 'oku 'aonga:uaea totolo sio ki he misini .
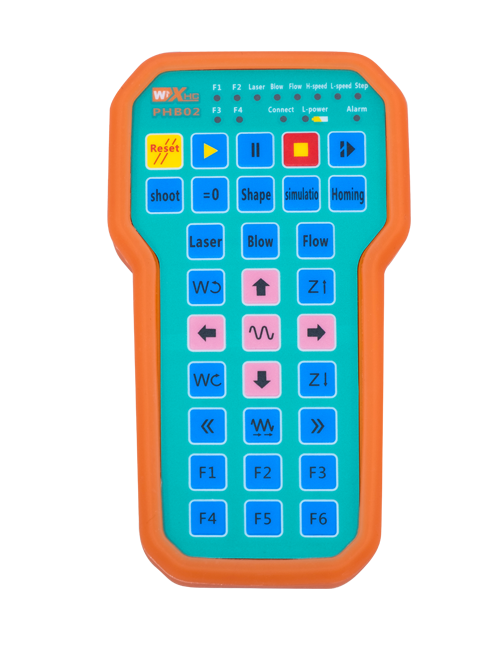
Fakatata 'o e ngaahi me'a 'o e koloa .
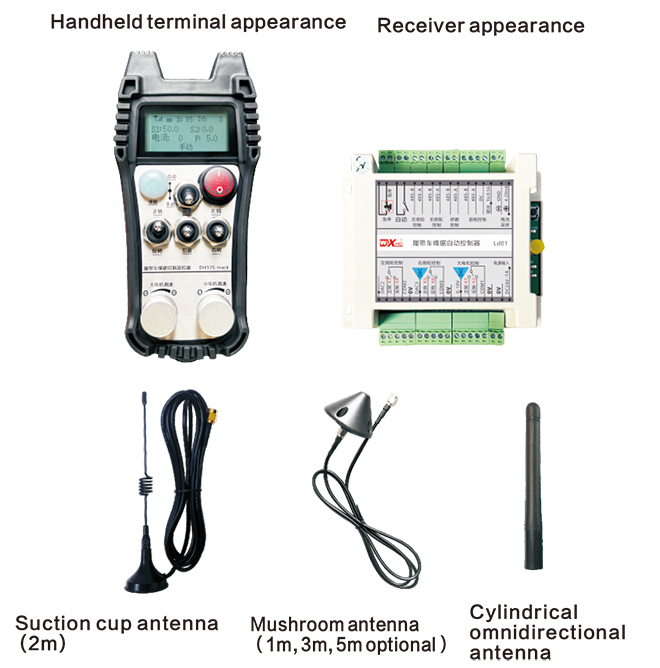
Tohi'i: Te ke lava ʻo fili ha taha ʻo e ngaahi ʻenitena ʻe tolú .. Ko e 'enitena 'o e ipu suction 'oku tu'unga ia 'i he default ..
Fakamatala pule'i mama'o 'o e switch .
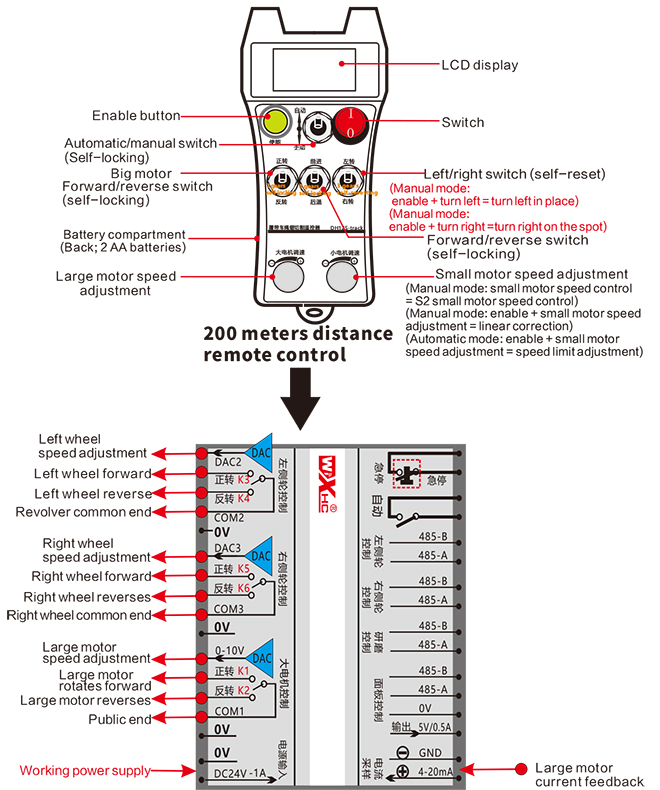
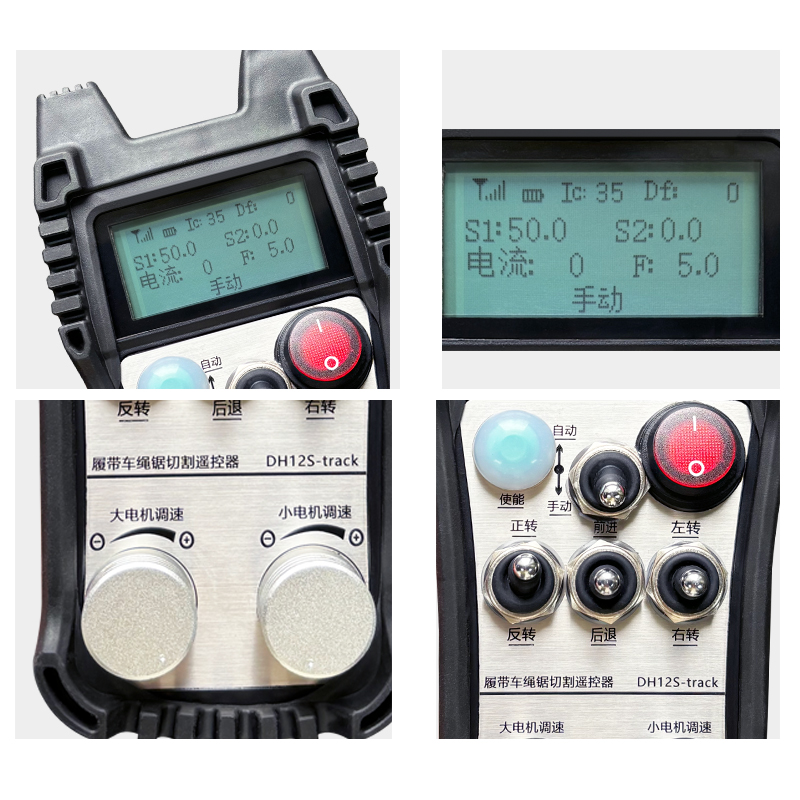
Fakahaa'i 'o e Faka'ali'ali .

Lahi vave 'o e motolo:S1:0-50
Si'isi'i 'a e vave 'o e me'alele: S2: 0-50
Ko e meʻa fakaʻofoʻofa fakaʻofoʻofá:F:0-30(fakangatangata 'o e fe'auhi)
Ko e motuhi 'otometiki lahi taha .: Ic: 0-35 (ngaahi fakangatangata 'oku lava ke fakatonutonu)
Mahu'inga fakatonutonu fakalaine: Df: -99-99 (1 ko e 'iuniti 'oku feunga mo e 0.02V .)

voliume ma'ulalo: 'Oku fu'u ma'ulalo 'a e 'uhila pule mama'o ., Kataki 'o fetongi 'a e 'uhila ..

Naʻe holo hifo ʻa e Netiueká: Ko e faka'ilonga uaealesi 'oku fakalavea'i .. Kataki 'o vakai'i 'a e mafai 'o e tokotaha 'oku ne ma'u ., toe fakamālohia ia, pea toe kamata 'a e pule mama'o ..
Ngaahi fakahinohino ki he ngaue pule'i mama'o .
1.Fakamoʻui ʻa e puleʻi mamaʻó .
Ko e taimi 'oku fakaivia ai 'a e ., 'oku kamata ke ulo 'a e maama RF-LED 'i he receiver .;fokotu'u ha ongo maa'imoa AA 'i he threeiver e pule'i mama'o ., fakamo'ui 'a e switch 'o e malohi ., pea 'e fakahaa'i 'e he faka'ali'ali 'a e vave 'o e me'alele ., 'oku fakahaa'i ai 'a e kamata'anga lavame'a.
2.Lahi 'a e me'alele mo e vave 'o e tu'utu'uni .
tamateʻi ʻa e “ki mu'a/fakafoki” liliu ki mu'a, ‘e fakamo’ui ‘a e misini lahi ‘a e tokotaha tali ., pea ʻe fakahaaʻi ʻe he fakaʻaliʻalí ki muʻa .
tamateʻi ʻa e “ki mu'a/fakafoki” liliu ki he tafa'aki ki mui, ko e lahi 'o e misini 'o e tokotaha 'oku ne ma'u 'e fakamo'ui 'i he fakafepaki ., pea ʻe fakahaaʻi ʻe he fakaʻaliʻalí ʻa e fakafepaki .
Fakafepakiʻi ʻa e . “lahi 'a e fakatonutonu 'o e vave 'o e me'alele” knob ke fakatonutonu 'a e ma'u 'o e vave 'o e vave 'o e fakatonutonu 'o e output 0-10V .;
3.Si'isi'i 'a e me'alele mo e vave 'o e tu'utu'uni .
Hiki ʻa e “ki mu'a/fakafoki” liliu ki mu'a, ko e uili to'ohema ki mu'a mo e uili to'omata'u ki mu'a 'o e me'a tali 'oku fakamo'ui ., pea ʻoku fakaʻaliʻali ʻa e fakaʻaliʻalí ki muʻa . 
tamateʻi ʻa e “Ki Mu'a/Le'oa” liliu ki he tafa'aki ki mui, 'oku fakamo'ui 'a e reverse 'o e uili to'ohema mo e uili to'omata'u 'o e receiver ., pea ʻoku fakahaaʻi ʻe he fakaʻaliʻalí ʻa e fakafepaki .
4.Tafoki ki he toʻohema mo e toʻomataʻu .
tamateʻi ʻa e “To'ohema/To'omata'u” liliu ki he toʻohema, ‘e fakahoko atu ‘a e uili to’omata’u ‘o e tokotaha tali pea fakamo’ui .,pea ʻe fakaʻaliʻali ʻa e fakaʻaliʻalí ʻi he toʻohemá .
tamateʻi ʻa e “afe ki he to'ohema/to'omata'u” liliu ki he to'omata'u ., ko e uili to'ohema 'o e tokotaha 'oku ne ma'u 'e 'alu ki mu'a pea fakamo'ui ., pea 'e faka'ali'ali 'a e faka'ali'ali 'i he tafa'aki to'omata'u .
5.afe
'I he founga tohi .:
Tafoki ki he feituʻú: Lomiʻi mo pukepuke ʻa e . “Fakaai” fakama'u, afe e “Tafokiʻi ʻo e Toʻohema/Toʻomataʻu .” liliu ki he toʻohema, ko e uili to'ohema ki mui mo e uili to'omata'u ki mu'a 'o e receiver 'oku fakamo'ui .,pea kamata ke afe ki he to'ohema 'i he feitu'u .;
Tafoki to'omata'u 'i he feitu'u .: Lomiʻi mo pukepuke ʻa e . “Fakaai” fakama'u, afe e “Tafokiʻi ʻo e Toʻohema/Toʻomataʻu .” liliu ki he to'omata'u, ko e uili to'ohema ki mu'a mo e uili to'omata'u 'o e me'a tali 'oku fakamo'ui ., pea 'oku kamata ke tafoki 'a e tokotaha tali 'i he feitu'u .;
6.Si'isi'i 'a e fakangatangata 'o e vave 'o e me'alele .
'I he founga 'otometiki .: lomiʻi mo pukepuke ʻa e . “Fakaai” button pea vilo 'a e . “Fe'unu'aki vave 'o e Motor 'o e Motor” ke fakatonutonu 'a e vave taha 'o e ki'i me'alele lolotonga 'a e motuhi 'otometiki .;
7.Ko e motuhi 'otometiki
Ko e sitepu 'uluaki ko e kamata 'a e misini lahi .; ko e sitepu hono ua ko hono liliu 'o e mode switch ki he . “Atoto”; ko e sitepu hono tolú ko hono kamataʻi ʻo e kiʻi meʻalelé pea ʻe fakaʻaliʻali ʻa e screen . “Ko hono motuhi ʻo e ʻOtó”,'oku fakahaa'i ai kuo ne hu ki he founga motuhi 'otometiki .;
8. fakatonutonu laine hangatonu
Ko e taimi 'oku nga'unu atu ai 'a e ngaahi misini luelue to'ohema mo to'omata'u ki mu'a pea ki mui ., ko e vave to'ohema mo e to'omata'u 'oku 'ikai ke tu'uma'u ., pea ʻoku mavahe ʻa e luelue hangatonu .. Te ke lava ʻo fakaʻaongaʻi ʻa e ngaue fakatonutonu fakalaine ʻo e puleʻi mamaʻo ke fine-tune ʻa e vave ʻo e ngaahi uili toʻohema mo e toʻomataʻu .;
Ko e tefitoʻi moʻoni ʻo e fakatonutonu .: 'I he ngaue fakatonutonu ., ko e vave 'o e uili to'ohema 'oku fine-tuned ke a'u ki he vave tatau mo e uili to'omata'u ., koe'uhi ke synchronize 'a e vave 'o e ngaahi uili to'ohema mo e to'omata'u pea fakangata 'a e deviation .;
Founga ngaue ki hono fakatonutonu 'o e deviation .: 'I he founga tohi ., lomiʻi mo pukepuke ʻa e . “Fakaai” button pea vilo 'a e . “Tu'utu'uni vave 'o e Motor”;
Fetongi fakauati ke fakalahi 'a e voliume vave 'o e uili to'ohema pea 'e fakalahi 'a e mahu'inga 'o e fakatonutonu 'i he screen faka'ali'ali .;
Fe'alu'aki counterclockwise ke fakasi'isi'i 'a e voliume vave 'o e uili to'ohema mo e mahu'inga 'o e fakatonutonu 'o e faka'ali'ali ke fakasi'isi'i .;
Ko e ngaahi tu'unga fakatonutonu: Mahu'inga fakatonutonu -90 ki 90; fakatonutonu 'o e voliume 'o e 'iuniti fakatonutonu 'e taha 'oku feunga mo e 0.02V .;
9. Menu 'o e parameter ('oku tapui 'a e kau faka'aonga'i ke nau fakalelei'i ia 'o 'ikai ha ngofua .)
'E lava ke fakatonutonu 'a e ngaahi ngaue 'e ni'ihi 'o e pule'i mama'o 'o fakafou 'i he ngaahi fakangatangata .. 'I he founga tohi ., 'i he taimi 'oku 'i ai 'a e ki'i vave 'o e me'alele S2 . 10, teke'i 'a e 'alu ki mu'a/fakafoki 'o tu'o tolu 'i he laine ., pea toki teke hifo tu'o tolu 'i he hokohoko ke fakahu 'a e menu 'o e parameter .;
Hu ki tu'a 'a e menu 'o e parameter .: fili ke fakahaofi pe 'ikai fakahaofi ., pea lomiʻi leva ʻa e pātene fakaʻatā ke fakapapauʻi ʻa e hūʻangá .;
Lolotonga lahi taha: ko e lolotonga 'oku fakafuofua'i 'o e motu'a 'o e motu'a ko e . 80% 'o e lolotonga ko 'eni;
vave 'a e pule'i 'o e ngaahi fakangatangata: 'otometiki 'a e pule'i 'o e motuhi ., tefito 800, 'oku tapui 'a e fakalelei'i .;
Parameter 'o e fakatauele'i: parameter pule'i 'otometiki 'o e motu'a .. 'I he taimi 'oku ma'olunga ange ai 'a e mahu'inga 'o e liliu lolotonga 'o e motuhi .,faka'auha ..
Fakavavevave a1.: parameter pule'i 'otometiki 'o e motu'a ., 'i he taimi 'oku ma'ulalo ange ai 'a e lolotonga 'o e motuhi 'i he seti 'o e motuhi ., ko e vave 'o e vave;
Fakatapui a2.: parameter pule'i 'otometiki 'o e motu'a ., 'i he taimi 'oku ma'olunga ange ai 'a e lolotonga 'o e motuhi 'i he seti .
motuhi 'a e lolotonga, ko e vave 'o e fakasi'isi'i;
Toe fakalelei'i 'otometiki 'o e hele .: hala;
Kamata ke lokaʻi kita: 0, ʻikai haʻane lokaʻi-kita; 1, kita. Lomiʻi ʻa e kī fakaʻatā . + ki muʻa mo fakafepakiʻi ke kamata ngāue mo lokaʻi ʻe ia ia ..
luelue lahi taha: ko e vave taha 'o e ki'i me'alele ..
Ko hono motuhi ʻo e lolotongá: seti 'a e lolotonga lahi taha 'o e me'alele tefito ki he motuhi 'otometiki .. Kapau 'oku lahi ange 'a e lolotonga 'o e ngaahi fakamatala 'i he mahu'inga ko 'eni ., ʻe kamata ke holo ia ..
Fakangatangata vave 'o e default .: 'a e vave 'o e vave taha 'o e vave 'o e motuhi 'otometiki 'i he taimi 'oku fakamo'ui ai 'a e misini ..
founga faka'otometiki: 0, 'oku pule'i 'otometiki 'a e switch 'otometiki .; 1, 'oku pule'i 'e he switch 'otometiki 'a e poini output 'otometiki ..
offset vave .: ko e vave taha 'o e ki'i me'alele lolotonga 'a e motuhi 'otometiki ..
Host lahi taha: vave lahi taha 'o e misini lahi ..
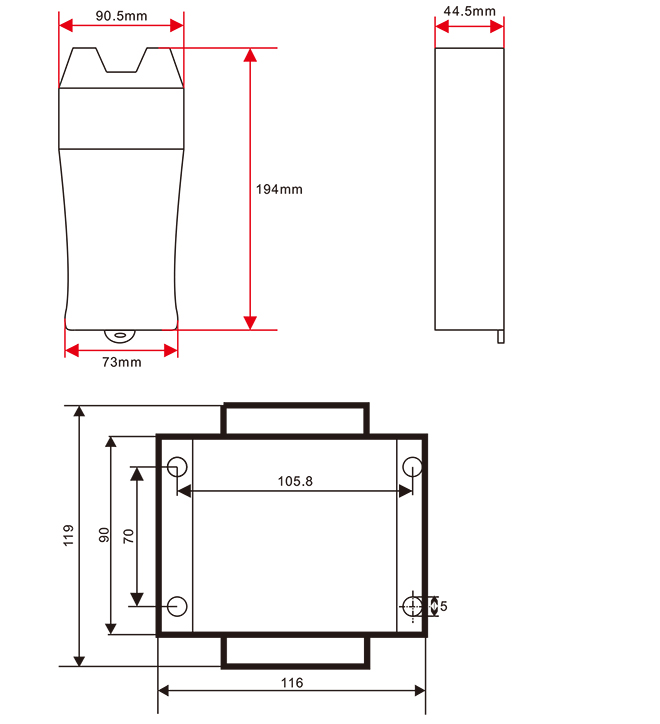
Pule'i mama'o 'a e ngaahi 'ulungaanga 'uhila .

Ko e lahi 'o e pule'i mama'o
Ko e totonu faka'osi faka'osi 'o e koloa ko 'eni 'oku 'a 'etau kautaha pe ..

