మద్దతు 32 custom button programming
మద్దతు 9 custom LED light display programming
Using 433MHZ wireless communication technology, the wireless operation
distance is 80 మీటర్లు
£300.00
మద్దతు 32 custom button programming
మద్దతు 9 custom LED light display programming
Using 433MHZ wireless communication technology, the wireless operation
distance is 80 మీటర్లు
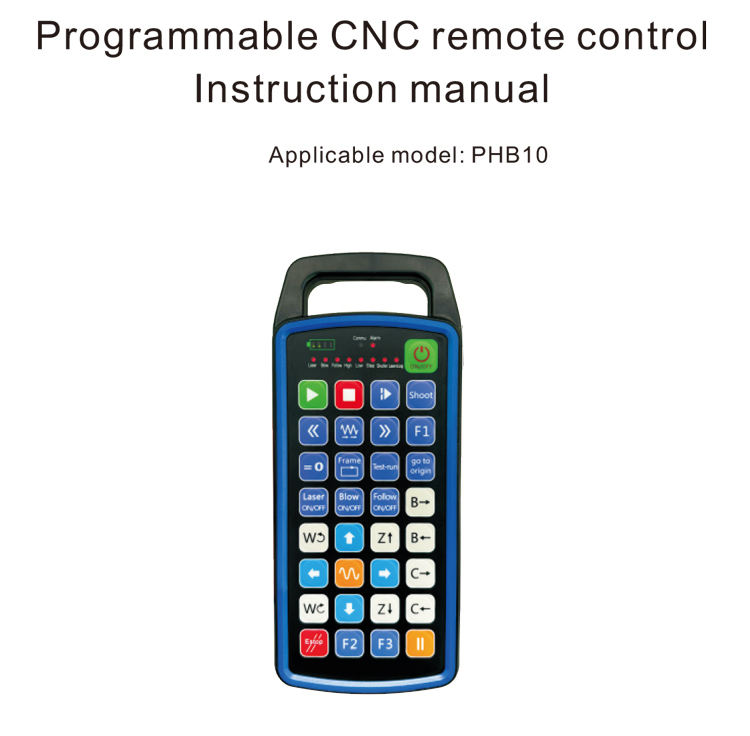
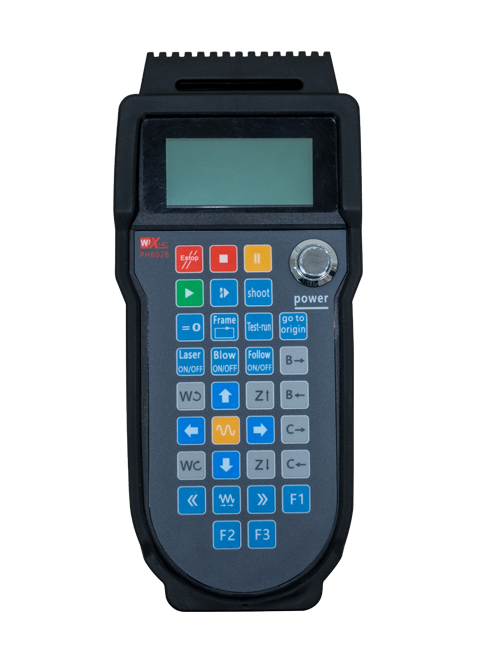
1.Product Introduction
The programmable CNC remote control PHB10 is suitable for wireless
remote control operation of various CNC systems. It supports user-defined
programming to develop button functions, and realize remote control of various
functions on the CNC system; it supports user-defined programming to develop
LED lights to light up and turn off, and realize dynamic display of system status;
the remote control comes with a rechargeable battery and supports Type-C
interface charging.
2.ఉత్పత్తి లక్షణాలు
1. Using 433MHZ wireless communication technology, the wireless operation
distance is 80 మీటర్లు;
2.Using automatic frequency hopping function, 32 sets of wireless remote
controllers can be used at the same time without affecting each other;
3.మద్దతు 32 custom button programming;
4.మద్దతు 9 custom LED light display programming;
5.Support IP67 waterproof level;
6.Support standard Type-C interface charging; 5V-2A charging specification;
1100 mAh large capacity battery, with automatic sleep standby function; realize
ultra-long low power standby;
7.Support real-time display of power.
3.కేబుల్ వైఫల్యం రేటు తగ్గింది

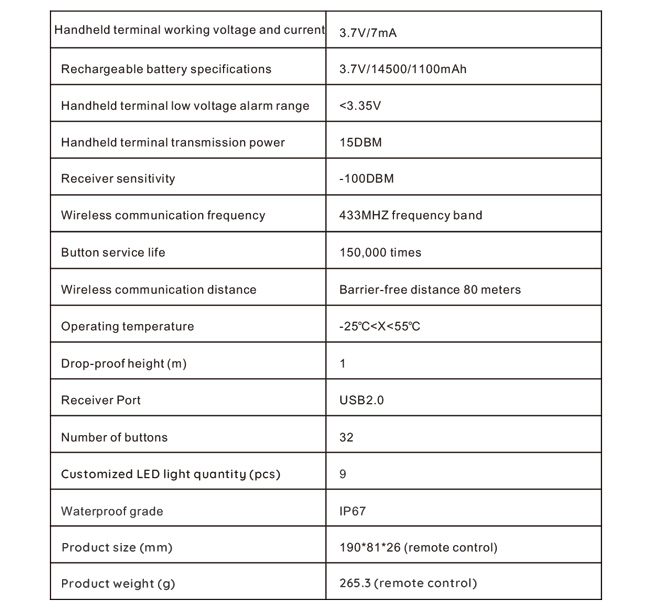
4. Product specifications
5.Product function introduction
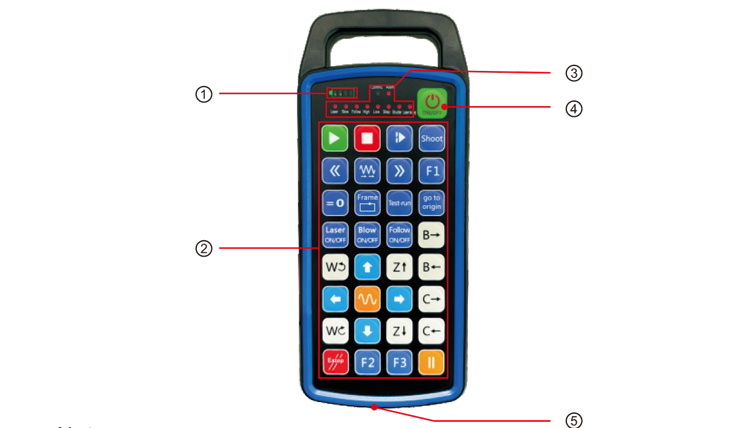
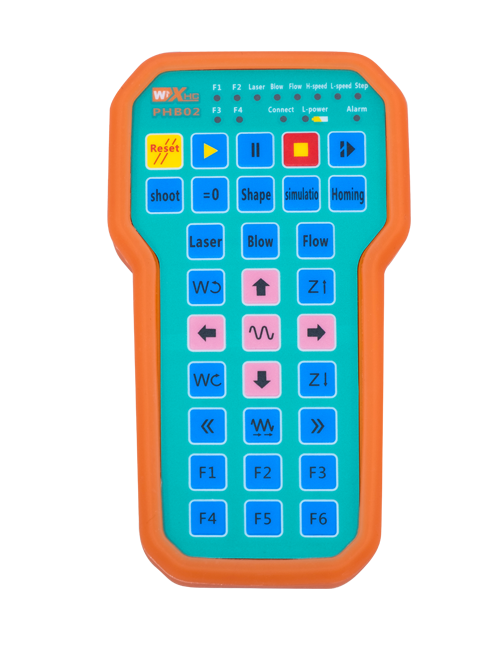
Notes:
①Battery level display:
Lights up after power on, turns off after power off;
If the battery indicator light is only one bar and keeps flashing, it means the
battery is too low. Please replace the battery;
If the battery indicator lights are all on and the other LED lights flash back and
forth, it means the battery is very low. Please replace the battery;
If the battery indicator does not light up or go out, and the device cannot be
started by pressing and holding the power button, please replace the battery;
②Button area:32 buttons arranged in 4X8, user-defined programming;
③Status LED:
COMMU: బటన్ సూచిక కాంతి, బటన్ నొక్కినప్పుడు మరియు వెళ్ళినప్పుడు వెలిగిస్తుంది
బటన్ విడుదలైనప్పుడు; ఇతర లైట్లు కస్టమ్ డిస్ప్లేలు;
Power పవర్ స్విచ్:
కోసం లాంగ్ ప్రెస్ 3 ఆన్ చేయడానికి సెకన్లు, కోసం లాంగ్ ప్రెస్ 3 ఆపివేయడానికి సెకన్లు;
పోర్ట్ ఛార్జింగ్:
ఛార్జ్ చేయడానికి టైప్-సి ఛార్జర్ను ఉపయోగించండి, ఛార్జింగ్ వోల్టేజ్ 5 వి, ప్రస్తుత 1A-2A; ఛార్జింగ్
సమయం 3-5 గంటల;
ఛార్జింగ్ చేసేటప్పుడు, పవర్ ఇండికేటర్ వెలుగుతుంది, ఇది ఛార్జింగ్ అని సూచిస్తుంది. ఎప్పుడు
పూర్తిగా ఛార్జ్ చేయబడింది, పవర్ ఇండికేటర్ మెరుస్తున్న లేకుండా పూర్తి బార్ను చూపుతుంది.
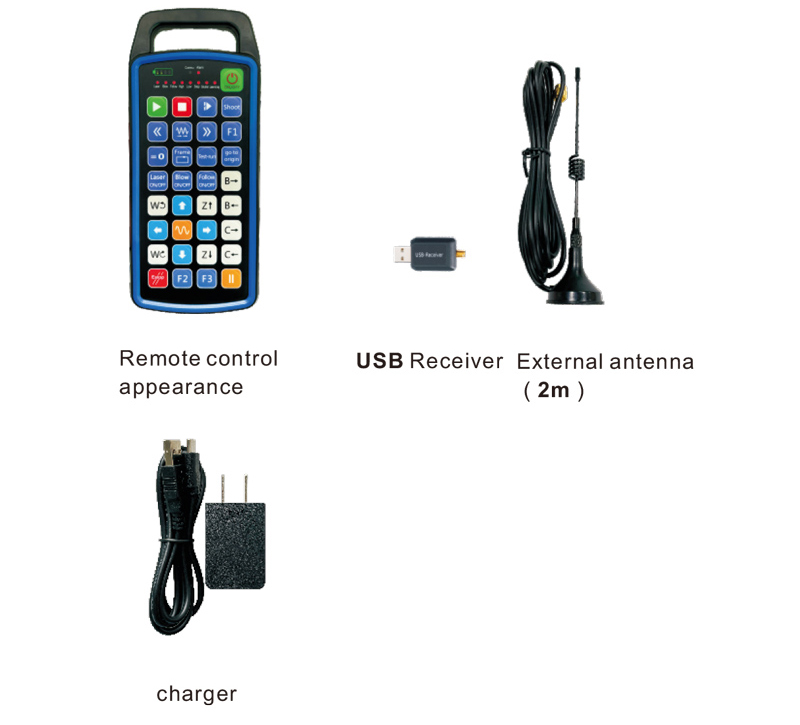
6.ఉత్పత్తి ఉపకరణాల రేఖాచిత్రం
7.ఉత్పత్తి సంస్థాపనా గైడ్
1 . నేను USB రిసీవర్ను కంప్యూటర్లోకి ప్రవేశిస్తాను, కంప్యూటర్ స్వయంచాలకంగా ఉంటుంది
మాన్యువల్ లేకుండా USB పరికర డ్రైవర్ను గుర్తించి ఇన్స్టాల్ చేయండి
2. ఛార్జర్లో రిమోట్ నియంత్రణను చొప్పించండి. బ్యాటరీ పూర్తిగా ఛార్జ్ చేయబడిన తరువాత, నొక్కండి
మరియు పవర్ బటన్ను పట్టుకోండి 3 సెకన్లు. రిమోట్ కంట్రోల్ ఆన్ మరియు పవర్ అవుతుంది
సూచిక వెలిగిపోతుంది, పవర్-ఆన్ విజయవంతమైందని సూచిస్తుంది.
3. శక్తివంతం చేసిన తరువాత, మీరు ఏదైనా బటన్ ఆపరేషన్ చేయవచ్చు. రిమోట్ కంట్రోల్
అదే సమయంలో డ్యూయల్ బటన్ ఆపరేషన్కు మద్దతు ఇవ్వగలదు. మీరు ఏదైనా బటన్ నొక్కినప్పుడు, ది
రిమోట్ కంట్రోల్ పై కామస్ లైట్ వెలిగిపోతుంది, ఈ బటన్ చెల్లుబాటు అని సూచిస్తుంది.
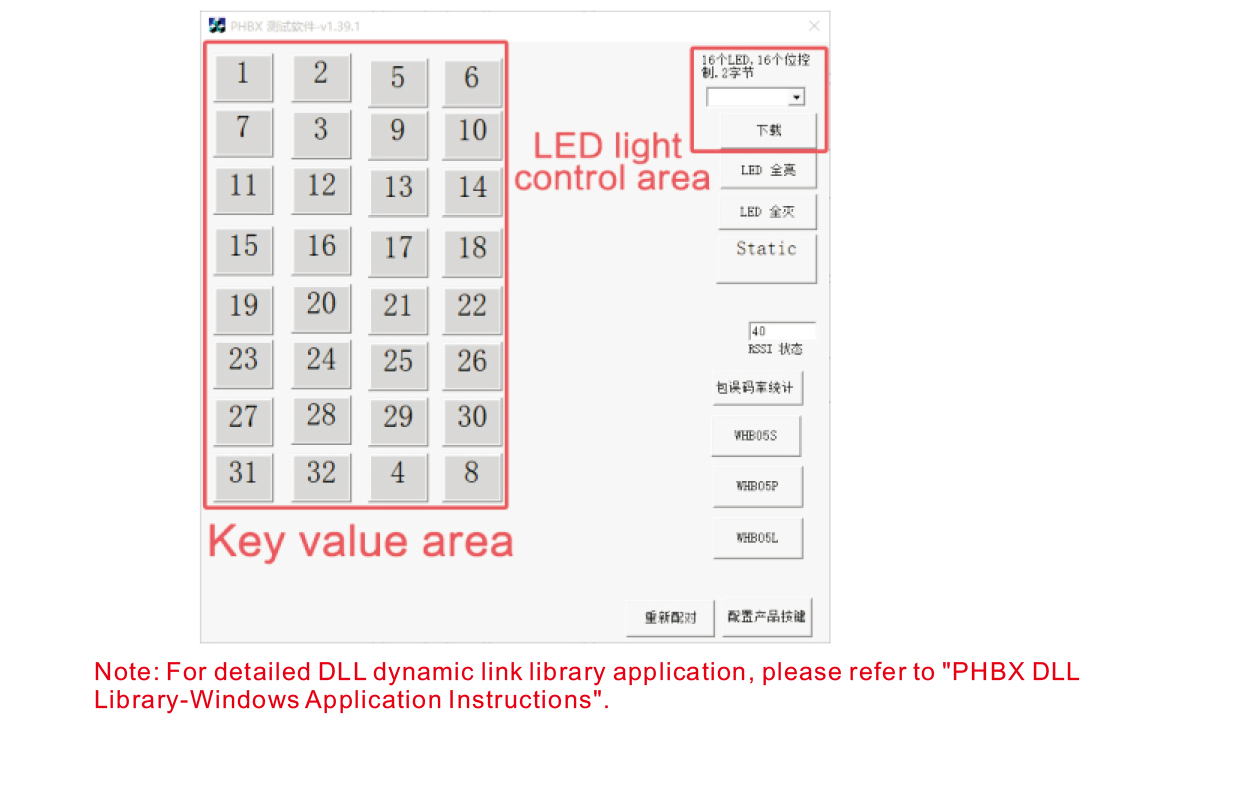
8.ఉత్పత్తి ఆపరేషన్ సూచనలు
ఉత్పత్తి అభివృద్ధి మరియు ఉపయోగం ముందు, మేము అందించే డెమో సాఫ్ట్వేర్ను మీరు ఉపయోగించవచ్చు
రిమోట్ కంట్రోల్పై బటన్లను మరియు రిమోట్ కంట్రోల్పై LED కాంతిని పరీక్షించండి. మీరు చేయవచ్చు
భవిష్యత్ ప్రోగ్రామింగ్ అభివృద్ధికి డెమోను రిఫరెన్స్ రొటీన్గా ఉపయోగించండి.
డెమో సాఫ్ట్వేర్ను ఉపయోగించే ముందు, దయచేసి USB రిసీవర్ను కంప్యూటర్లోకి ప్లగ్ చేయండి,
రిమోట్ కంట్రోలర్కు తగినంత శక్తి ఉందని నిర్ధారించుకోండి, పవర్ బటన్ను t కి నొక్కండి మరియు పట్టుకోండి
urn it, ఆపై దాన్ని ఉపయోగించండి;
రిమోట్ కంట్రోల్లోని ఏదైనా బటన్ నొక్కినప్పుడు, టెస్ట్ సాఫ్ట్వేర్ డెమో ప్రదర్శించబడుతుంది
సంబంధిత కీ విలువ. విడుదల చేసిన తరువాత, కీ విలువ ప్రదర్శన అదృశ్యమవుతుంది,
కీ అప్లోడ్ సాధారణమని సూచిస్తుంది;
మీరు టెస్ట్ సాఫ్ట్వేర్ డెమోలో LED లైట్ నంబర్ను కూడా ఎంచుకోవచ్చు, డౌన్లోడ్ క్లిక్ చేయండి,
మరియు రిమోట్ కంట్రోల్లో సంబంధిత కాంతి సంఖ్య వెలిగిపోతుంది, అది సూచిస్తుంది
LED లైట్ సాధారణంగా డౌన్లోడ్ అవుతోంది.
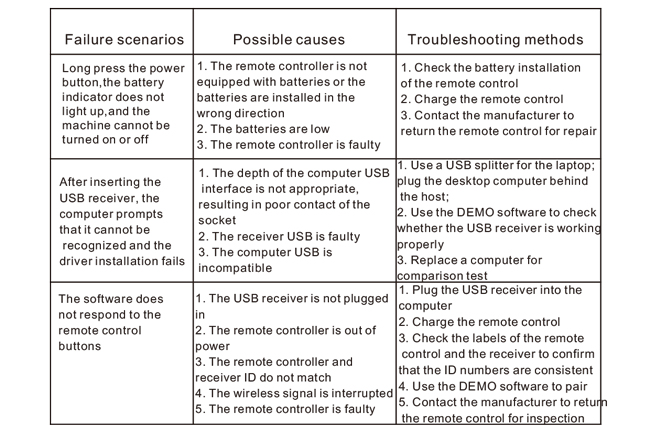
9.ఉత్పత్తి ట్రబుల్షూటింగ్
10. నిర్వహణ మరియు సంరక్షణ
1. దయచేసి పొడి వాతావరణంలో సాధారణ ఉష్ణోగ్రత మరియు విస్తరించడానికి ఒత్తిడితో ఉపయోగించండి
సేవా జీవితం;
2. కీ యొక్క సేవా జీవితాన్ని విస్తరించడానికి కీ ప్రాంతాన్ని తాకడానికి పదునైన వస్తువులను ఉపయోగించవద్దు;
3. కీ దుస్తులను తగ్గించడానికి దయచేసి కీ ప్రాంతాన్ని శుభ్రంగా ఉంచండి;
4. రిమోట్ కంట్రోల్కు నష్టం కలిగించేలా పిండి వేయడం మరియు పడకుండా ఉండండి;
5. ఎక్కువ కాలం ఉపయోగించకపోతే, దయచేసి బ్యాటరీని తీసివేసి రిమోట్ కంట్రోల్ నిల్వ చేయండి
and battery in a clean and safe place;
6. Pay attention to moisture-proof during storage and transportation.
11.Safety Information
1. Please read the instructions carefully before use. Non-professionals are prohibited from
operating.
2. Please use the original charger or a charger produced by a regular manufacturer with the
same specifications.
3. Please charge in time to avoid incorrect operation due to insufficient power causing the
remote control to be unresponsive.
4. If repair is required, please contact the manufacturer. If the damage is caused by self-repair,
the manufacturer will not provide warranty.