Descrição
Modelo de produto
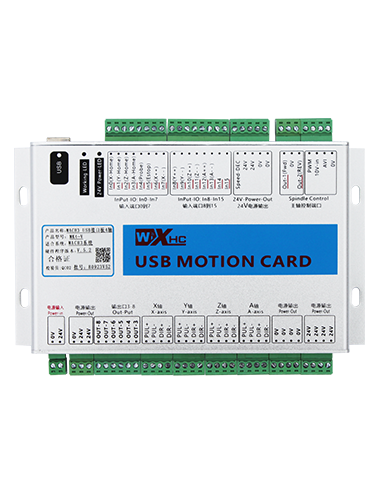
Modelo: DH12S-LD
Equipamento aplicável:máquina de serra de fio sobre esteiras
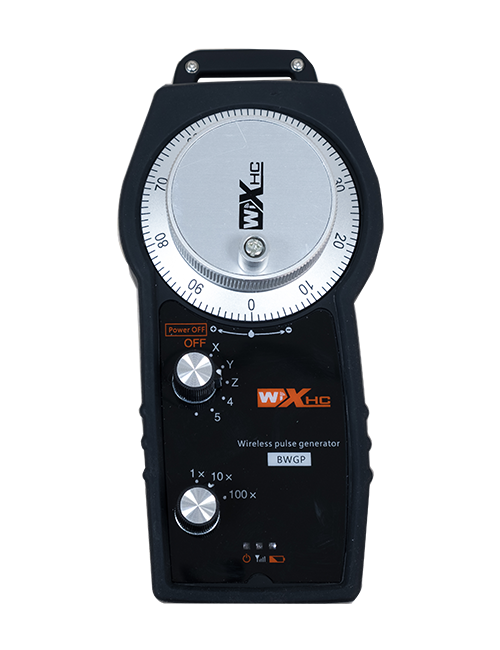
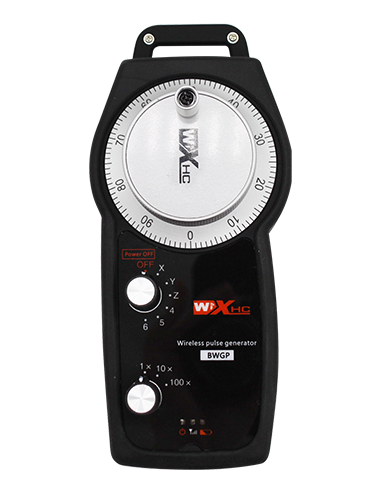
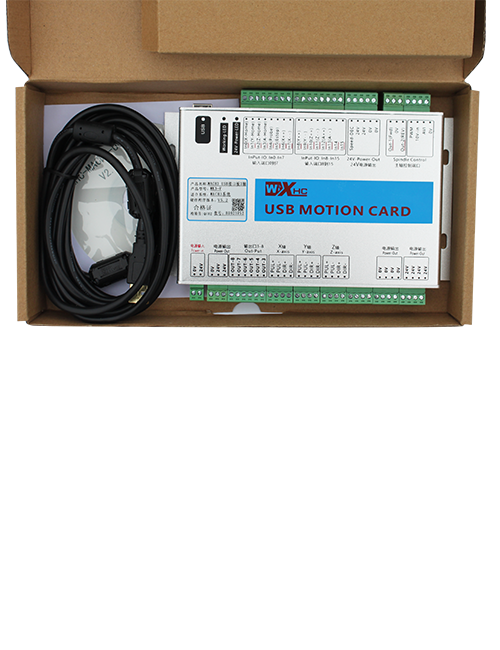
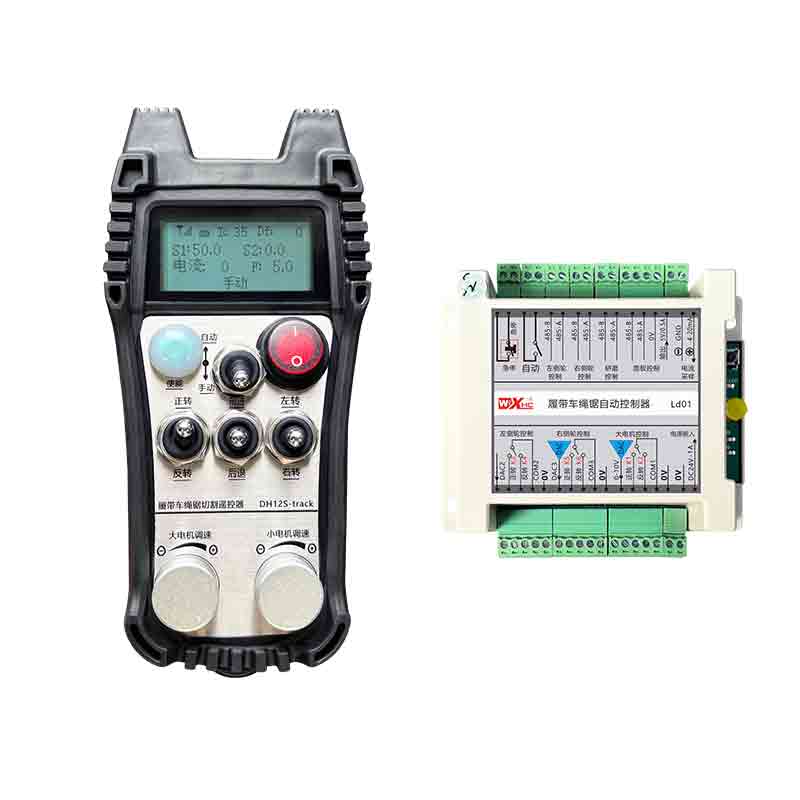
Diagrama de acessórios de produto
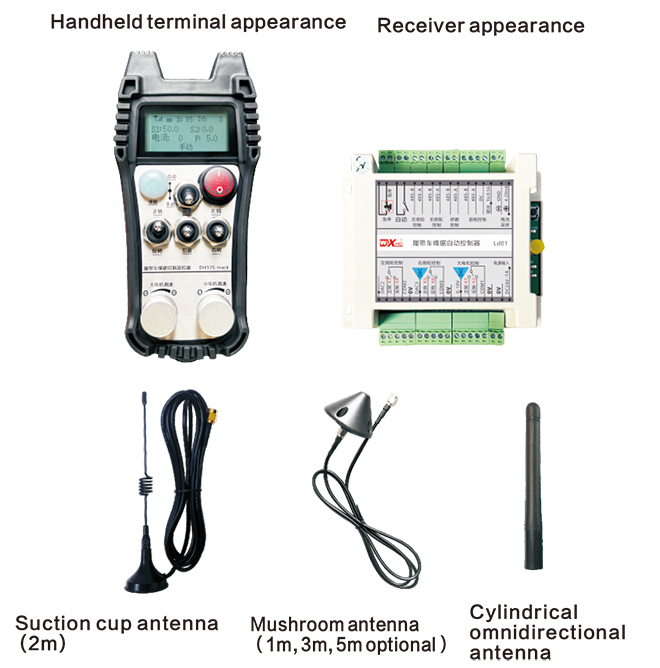
Observação: Você pode escolher uma das três antenas. A antena da Copa da Sucção é padrão por padrão.
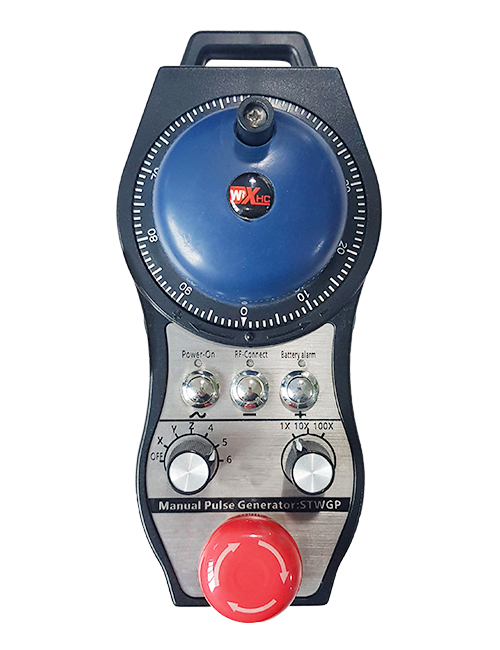
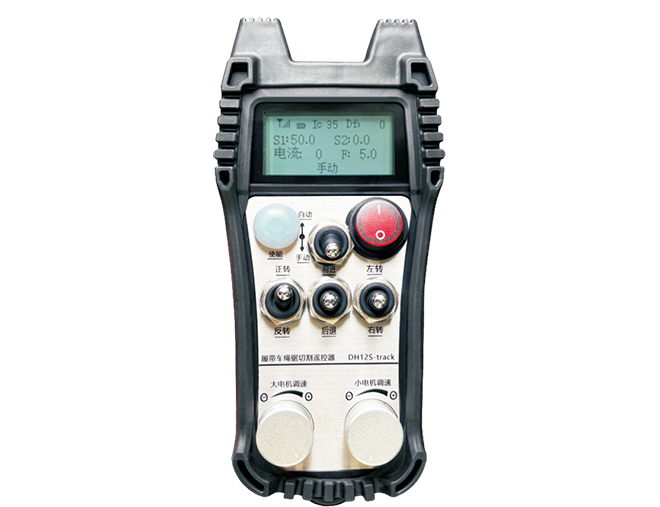
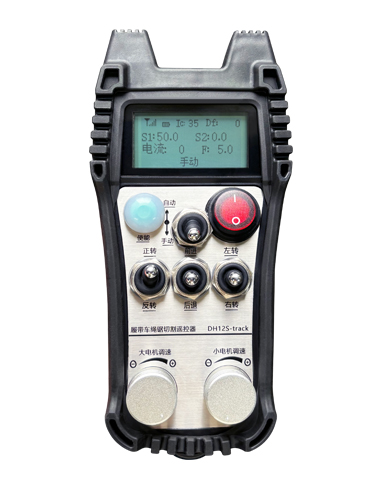
Descrição do interruptor de controle remoto
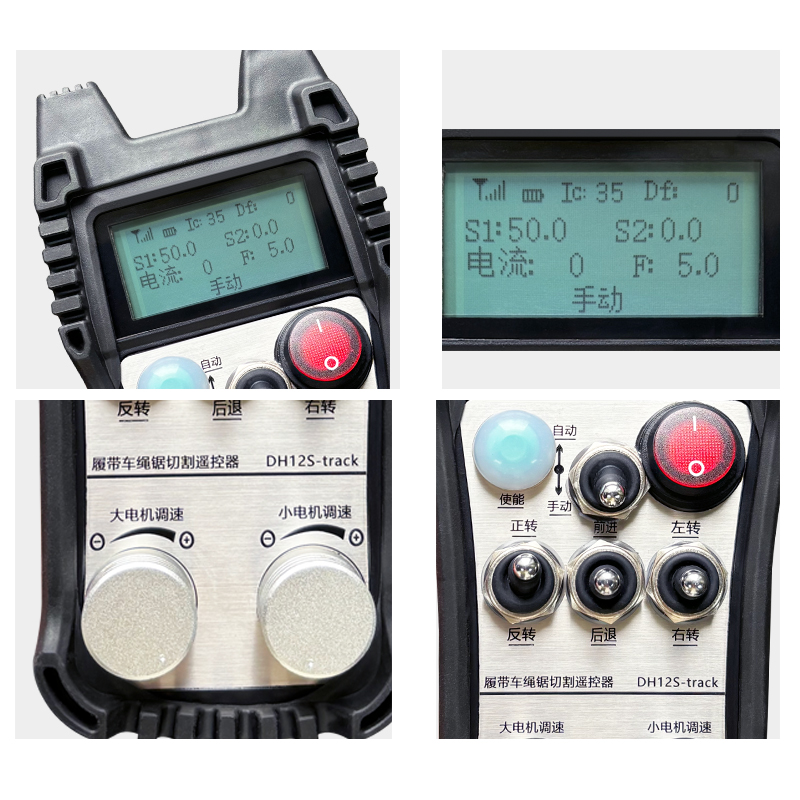
DisplayContent Introdução

Grande velocidade do motor:S1:0-50
Velocidade do motor pequena: S2: 0-50
Limite máximodevelocidadedecorteautomáticomotorpequeno:F:0-30(parâmetrosajustáveis)
Corrente máxima de corte automático: Eu: 0-35 (Parâmetros ajustáveis)
Valor de correção linear: Df: -99-99 (1 unidade é de cerca de 0,02 V)

Baixa tensão: A bateria de controle remoto é muito baixo, Substitua a bateria.

Rede caiu: O sinal sem fio é interrompido. Por favor, verifique o poder do receptor, Ponha -o de novo, e reiniciar o controle remoto.
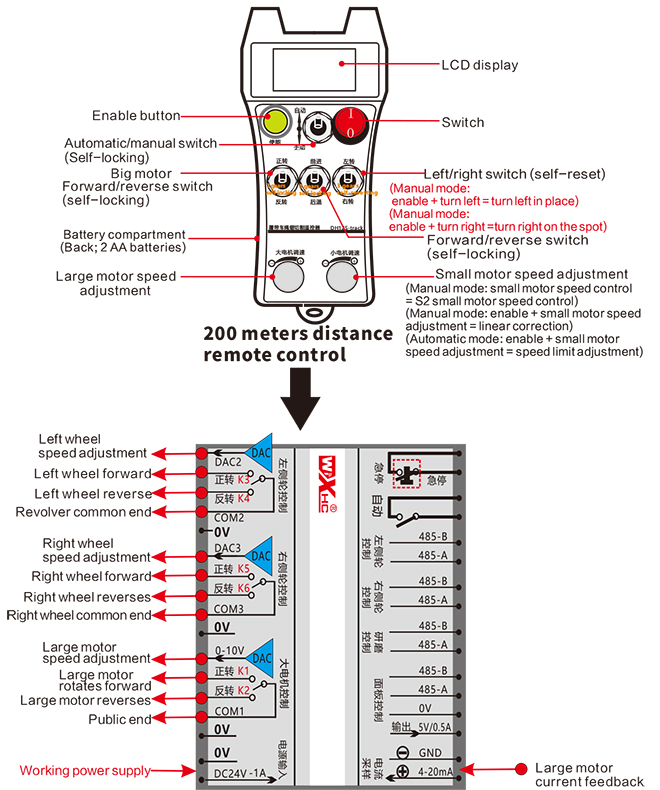
Instruções de operação de função de controle remoto
1.Ligue o controle remoto
Quando o está ligado, a luz RF-LED no receptor começa a piscar;instale duas pilhas AA no três receptor e controle remoto, Ligue o interruptor, e o display mostrará a velocidade do motor, indicando uma inicialização bem -sucedida.
2.Motor grande e regulação de velocidade
Gire o “avançar/reverso” mude para a frente, o grande motor do receptor ligará, e o display mostrará adiante
Gire o “avançar/reverso” mude para reverter, o grande motor do receptor ligará ao contrário, e o display mostrará reverso
Gire o “grande ajuste de velocidade do motor” botão para ajustar a grande tensão de saída de ajuste de velocidade do motor do receptor 0-10V;
3.Motor pequeno e regulação de velocidade
Mova o “avançar/reverso” mude para a frente, a roda esquerda para frente e a roda direita para frente do receptor estão ligadas, e o display mostra para frente
Gire o “Avançar/reverso” mude para reverter, a ré da roda esquerda e a ré da roda direita do receptor estão ligadas, e o display mostra reverso
4.Vire à esquerda e à direita
Gire o “Esquerda/Direita” mudar para a esquerda, a roda direita do receptor avançará e ligará,e o display mostrará esquerda
Gire o “vire à esquerda/direita” mudar para virar à direita, a roda esquerda do receptor irá avançar e ligar, e o display mostrará vire à direita
5.Vire no lugar
No modo manual:
Vire à esquerda no lugar: Pressione e segure o “Habilitar” botão, gire o “Virar à esquerda/direita” mudar para a esquerda, a roda esquerda para trás e a roda direita para frente do receptor estão ligadas,e comece a virar à esquerda no lugar;
Vire à direita no lugar: Pressione e segure o “Habilitar” botão, gire o “Virar à esquerda/direita” mudar para a direita, a roda esquerda para frente e a roda direita para trás do receptor estão ligadas, e o receptor começa a virar à direita no lugar;
6.Ajuste pequeno do limite de velocidade do motor
No modo automático: pressione e segure o “Habilitar” botão e gire o “Ajuste de velocidade do motor pequeno” para ajustar a velocidade máxima do pequeno motor durante o corte automático;
7.Corte automático
O primeiro passo é ligar o grande motor; o segundo passo é mudar o interruptor de modo para “Auto”; o terceiro passo é ligar o pequeno motor e a tela exibirá “Corte automático”,indicando que entrou no modo de corte automático;
8. Correção de linha reta
Quando os motores de caminhada esquerdo e direito estão se movendo para frente e para trás, as velocidades esquerda e direita são inconsistentes, e a caminhada em linha reta se desvia. Você pode usar a função de correção linear do controle remoto para ajustar a velocidade das rodas esquerda e direita;
Princípio de correção: Através da função de correção, a velocidade da roda esquerda é ajustada para atingir a mesma velocidade que a roda direita, de modo a sincronizar a velocidade das rodas esquerda e direita e eliminar o desvio;
Método de operação de correção de desvio: No modo manual, pressione e segure o “Habilitar” botão e gire o “Regulação de velocidade de motor pequeno”;
Gire no sentido horário para aumentar a tensão da velocidade da roda esquerda e o valor de correção na tela aumentará;
Gire no sentido anti-horário para reduzir a tensão da velocidade da roda esquerda e o valor de correção do display para diminuir;
Faixa de correção: Valor de correção -90 para 90; a tensão de correção de uma unidade de correção é de cerca de 0,02 V;
9. Menu de parâmetros (Os usuários são proibidos de modificá -lo sem permissão)
Algumas funções do controle remoto podem ser ajustadas através de parâmetros. No modo manual, quando a pequena velocidade do motor S2 é 10, Empurre o interruptor para frente/reverso três vezes seguidas, e, em seguida, pressione-o três vezes seguidas para entrar no menu de parâmetros;
Saia do menu do parâmetro: escolha salvar ou não salvar, em seguida, pressione o botão ativar para confirmar a saída;
Corrente máxima: a corrente nominal operacional do motor de corte é 80% desta corrente;
Parâmetros de controle de velocidade: parâmetros de controle de corte automático, padrão 800, Modificação é proibida;
Parâmetro de desaceleração: parâmetro de controle de corte automático. Quando o valor da mudança de corrente de corte excede este valor,começa a desaceleração.
Aceleração A1: parâmetro de controle de corte automático, quando a corrente de corte é inferior à corrente de corte definida, a velocidade da aceleração;
Desaceleração A2: parâmetro de controle de corte automático, quando a corrente de corte for superior à definida
corrente de corte, a velocidade de desaceleração;
Retração automática da faca: inválido;
Iniciar o travamento automático: 0, sem travamento automático; 1, travamento automático. Pressione a tecla de ativação + avançar e retroceder para ter efeito e travar automaticamente.
Caminhada máxima: a velocidade máxima do pequeno motor.
Corrente de corte: definir a corrente máxima do motor principal para corte automático. Se a corrente de feedback exceder este valor, vai começar a desacelerar.
Limite de velocidade padrão: a velocidade máxima padrão da velocidade de corte automática ao ligar a máquina.
Modo automático: 0, o interruptor automático é controlado automaticamente; 1, o interruptor automático controla o ponto de saída IO automático.
Deslocamento do limite de velocidade: a velocidade máxima do pequeno motor durante o corte automático.
Host máximo: velocidade máxima do motor grande.
Características elétricas de controle remoto

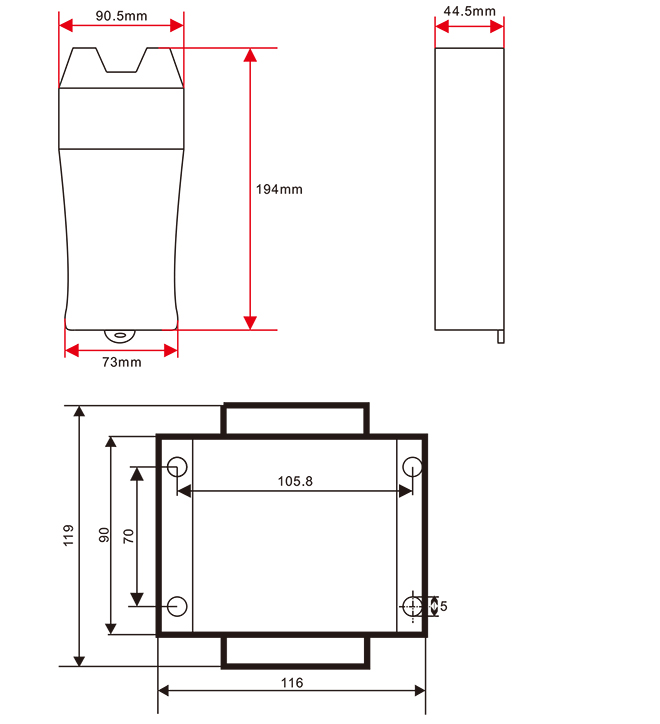
Tamanho do controle remoto
O direito de interpretação final deste produto pertence apenas à nossa empresa.
-500x650.png)