Opis
Model produktu
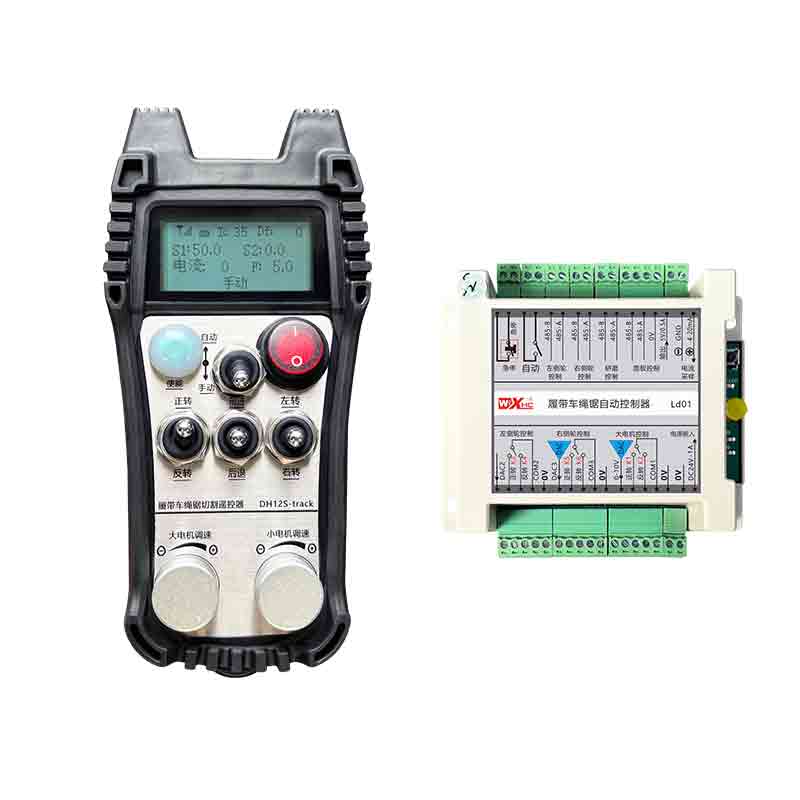
Model: DH12S-LD
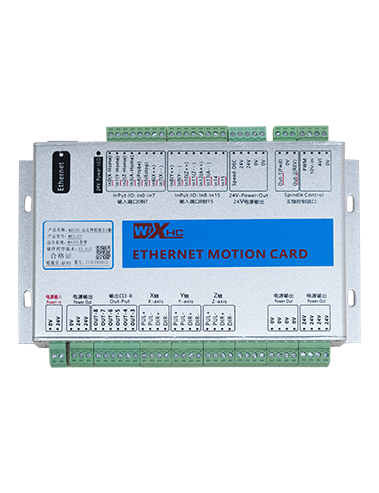
Obowiązujący sprzęt:crawler wire saw machine
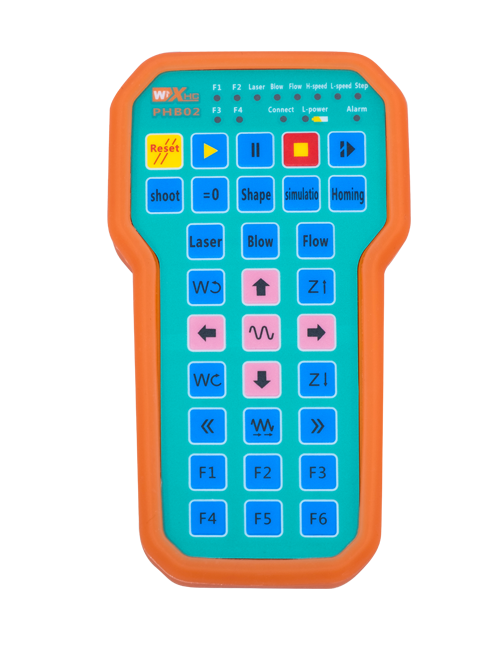
Schemat akcesoriów produktu
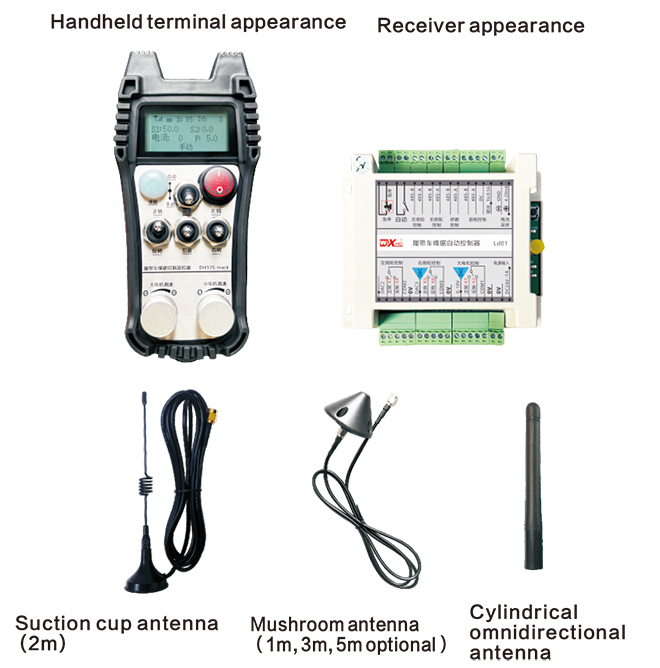
Notatka: Możesz wybrać jedną z trzech anten. Antena z przyssawką jest standardem w standardzie.
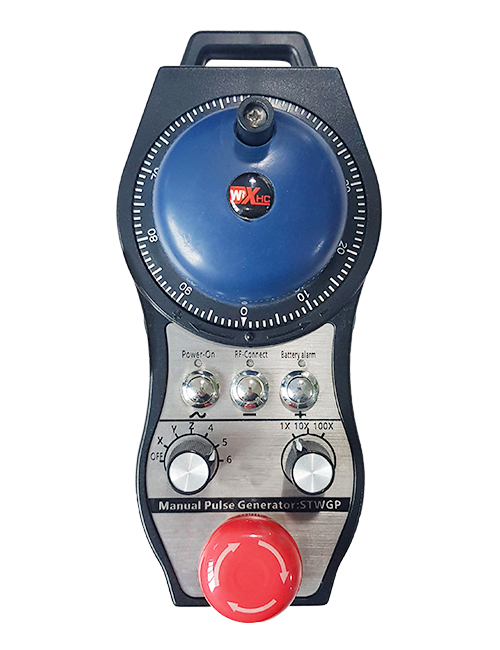
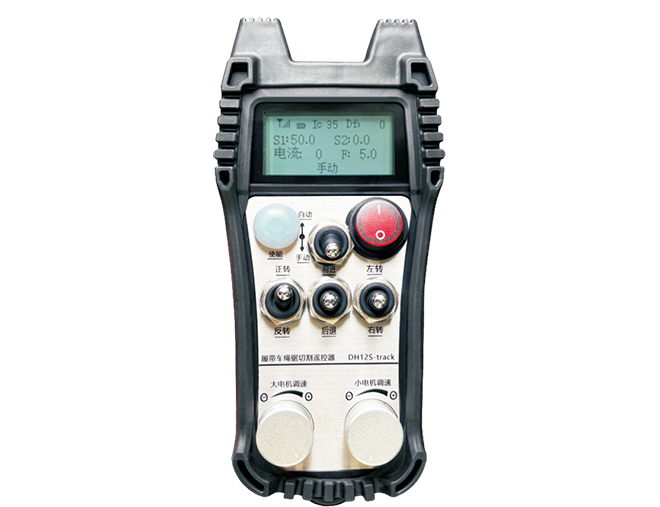
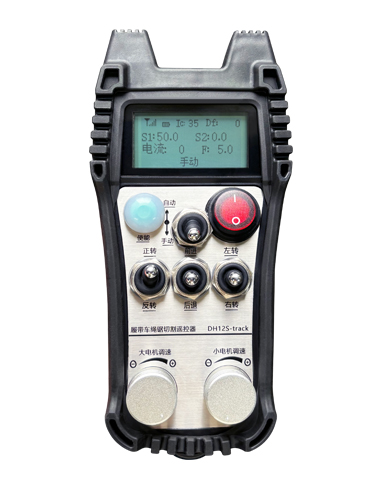
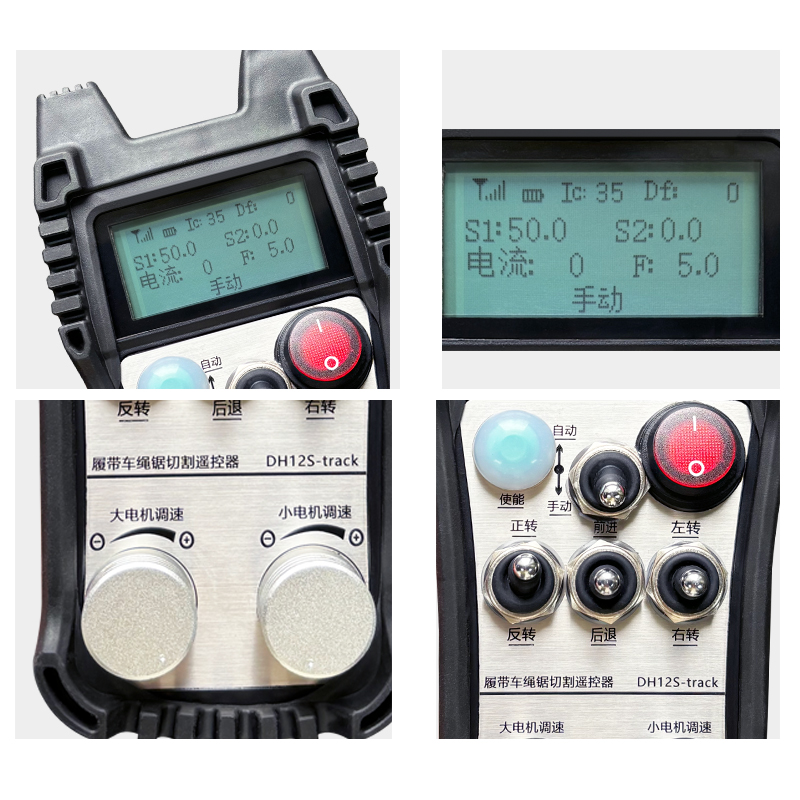
Opis przełącznika zdalnego sterowania
Wprowadzenie do treści displayowych

Large motor speed:S1:0-50
Small motor speed: S2: 0-50
Maximumspeedlimitofautomatic cuttingsmallmotor:F:0-30(parametersadjustable)
Automatic cutting maximum current: Ic: 0-35 (parametry regulowane)
Linear correction value: Df: -99-99 (1 unit is about 0.02V)

Niskie napięcie: Bateria zdalnego sterowania jest zbyt niska, Proszę wymienić baterię.

Sieć spadła: Sygnał bezprzewodowy jest przerywany. Sprawdź moc odbiornika, Włącz to ponownie, i uruchom ponownie pilot.
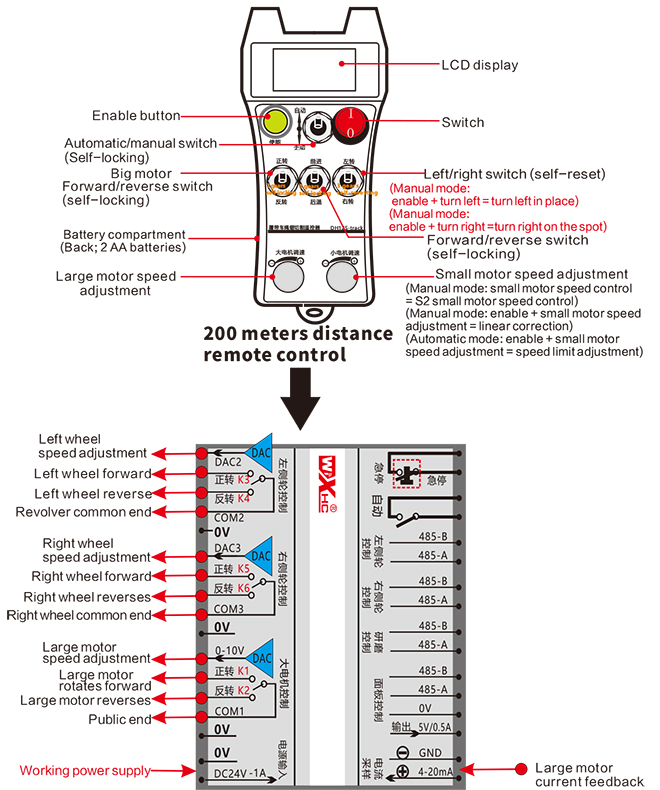
Instrukcje działania funkcji zdalnego sterowania
1.Turn on the remote control
When the is powered on, the RF-LED light on the receiver starts to flash;install two AA batteries in threceiver e remote control, Włącz przełącznik zasilania, andthe display will show the motor speed, wskazanie udanego uruchamiania.
2.Large motor and speed regulation
Obróć “do przodu/do tyłu” Przełącz się do przodu, the receiver’s large motor will turn on, and the display will show forward
Obróć “do przodu/do tyłu” przełączyć na bieg wsteczny, the large motor of the receiver will turn on in reverse, and the display will show reverse
Obróć “large motor speed adjustment” knob to adjust the receiver’s large motor speed adjustment output voltage 0-10V;
3.Small motor and speed regulation
Move the “do przodu/do tyłu” Przełącz się do przodu, the left wheel forward and right wheel forward of the receiver are turned on, and the display shows forward
Obróć “Do przodu/do tyłu” przełączyć na bieg wsteczny, the left wheel reverse and right wheel reverse of the receiver are turned on, and the display shows reverse
4.Turn left and right
Obróć “Left/Right” switch to left, the receiver’s right wheel will forward and turn on,and the display will show left
Obróć “turn left/right” switch to turn right, the left wheel of the receiver will forward and turn on, and the display will show turn right
5.Turn in place
W trybie ręcznym:
Turn left in place: Naciśnij i przytrzymaj “Enable” button, obrócić “Left/Right Turn” switch to left, the left wheel backward and right wheel forward of the receiver are turned on,and start turning left in place;
Turn right in place: Naciśnij i przytrzymaj “Enable” button, obrócić “Left/Right Turn” switch to right, the left wheel forward and right wheel reverse of the receiver are turned on, and the receiver starts to turn right in place;
6.Small motor speed limit adjustment
W trybie automatycznym: press and hold the “Enable” przycisk i obróć “Small Motor Speed Adjustment” to adjust the maximum speed of the small motor during automatic cutting;
7.Automatyczne cięcie
The first step is to start the big motor; the second step is to switch the mode switch to “Auto”; the third step is to start the small motor and the screen will display “Cutting Auto”,indicating that it has entered the automatic cutting mode;
8. Straight line correction
When the left and right walking motors are moving forward and backward, the left and right speeds are inconsistent, and the straight-line walking deviates. You can use the linear correction function of the remote control to fine-tune the speed of the left and right wheels;
Correction principle: Through the correction function, the speed of the left wheel is fine-tuned to reach the same speed as the right wheel, so as to synchronize the speed of the left and right wheels and eliminate the deviation;
Deviation correction operation method: W trybie ręcznym, press and hold the “Enable” przycisk i obróć “Small Motor Speed Regulation”;
Rotate clockwise to increase the left wheel speed voltage and the correction value on the display screen will increase;
Rotate counterclockwise to reduce the left wheel speed voltage and the display correction value to decrease;
Correction range: Correction value -90 to 90; correction voltage of one correction unit is about 0.02V;
9. Parameter menu (Użytkownikom zabroniono jej modyfikacji bez pozwolenia)
Some functions of the remote control can be adjusted through parameters. W trybie ręcznym, when the small motor speed S2 is 10, Naciśnij przełącznik do przodu/do tyłu trzy razy z rzędu, and then push it down three times in a row to enter the parameter menu;
Wyjdź z menu parametrów: choose to save or not save, then press the enable button to confirm the exit;
Maksymalny prąd: the operating rated current of the cutting motor is 80% of this currentt;
Parametry kontroli prędkości: automatic cutting control parameters, domyślny 800, modyfikacja jest zabroniona;
Parametr opóźnienia: automatic cutting control parameter. Gdy wartość zmiany prądu cięcia przekracza tę wartość,deceleration begins.
Przyspieszenie A1: automatic cutting control parameter, when the cutting current is lower than the set cutting current, the speed of acceleration;
Opóźnienie A2: automatic cutting control parameter, when the cutting current is higher than the set
cutting current, the speed of deceleration;
Automatic knife retraction: invalid;
Start self-locking: 0, no self-locking; 1, self-locking. Press the enable key + forward and reverse to take effect and self-lock.
Maksymalne chodzenie: the maximum speed of the small motor.
Cięcie prądu: set the maximum current of the main motor for automatic cutting. If the feedback current exceeds this value, it will start to decelerate.
Domyślne ograniczenie prędkości: the default maximum speed of automatic cutting speed when turning on the machine.
Automatic mode: 0, the automatic switch is automatically controlled; 1, the automatic switch controls the automatic IO output point.
Przesunięcie ograniczenia prędkości: the maximum speed of the small motor during automatic cutting.
Maksymalny gospodarz: maximum speed of large motor.
Charakterystyka elektryczna pilota zdalnego sterowania

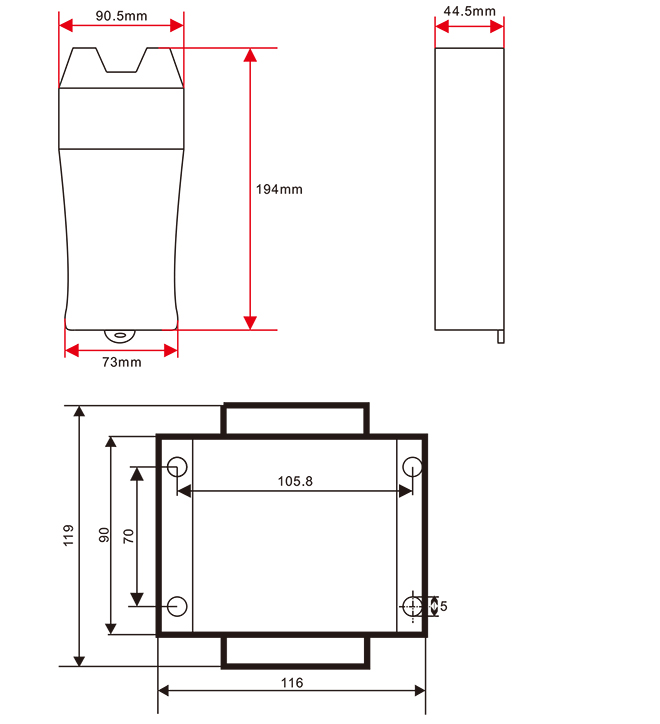
Rozmiar pilota
Ostateczne prawo do interpretacji tego produktu należy wyłącznie do naszej firmy.
-500x650.png)