ਸਹਾਇਤਾ 32 ਕਸਟਮ ਬਟਨ ਪ੍ਰੋਗਰਾਮਿੰਗ
ਸਹਾਇਤਾ 9 ਕਸਟਮ LED ਲਾਈਟ ਡਿਸਪਲੇਅ ਪ੍ਰੋਗਰਾਮਿੰਗ
433MHz ਵਾਇਰਲੈੱਸ ਸੰਚਾਰ ਟੈਕਨੋਲੋਜੀ ਦੀ ਵਰਤੋਂ ਕਰਨਾ, ਵਾਇਰਲੈੱਸ ਓਪਰੇਸ਼ਨ
ਦੂਰੀ ਹੈ 80 ਮੀਟਰ
£300.00
ਸਹਾਇਤਾ 32 ਕਸਟਮ ਬਟਨ ਪ੍ਰੋਗਰਾਮਿੰਗ
ਸਹਾਇਤਾ 9 ਕਸਟਮ LED ਲਾਈਟ ਡਿਸਪਲੇਅ ਪ੍ਰੋਗਰਾਮਿੰਗ
433MHz ਵਾਇਰਲੈੱਸ ਸੰਚਾਰ ਟੈਕਨੋਲੋਜੀ ਦੀ ਵਰਤੋਂ ਕਰਨਾ, ਵਾਇਰਲੈੱਸ ਓਪਰੇਸ਼ਨ
ਦੂਰੀ ਹੈ 80 ਮੀਟਰ
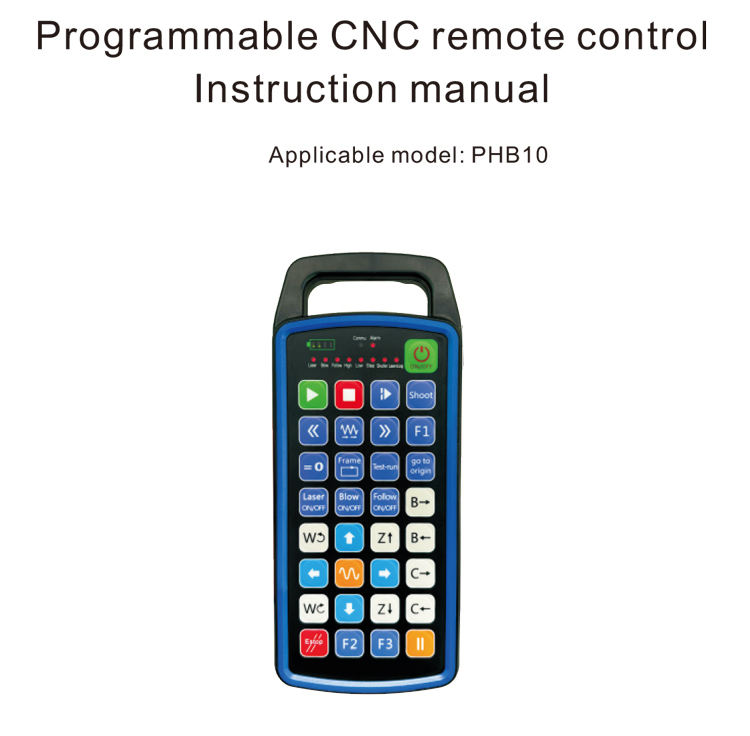
1.ਉਤਪਾਦ ਜਾਣ ਪਛਾਣ
ਪ੍ਰੋਗਰਾਮੇਬਲ ਸੀ ਐਨ ਸੀ ਰਿਮੋਟ ਕੰਟਰੋਲ PHB10 ਵਾਇਰਲੈੱਸ ਲਈ is ੁਕਵਾਂ ਹੈ
ਵੱਖ ਵੱਖ CNC ਸਿਸਟਮ ਦਾ ਰਿਮੋਟ ਕੰਟਰੋਲ ਓਪਰੇਸ਼ਨ. ਇਹ ਉਪਭੋਗਤਾ ਦੁਆਰਾ ਪ੍ਰਭਾਸ਼ਿਤ ਕਰਦਾ ਹੈ
ਖੇਡ ਕਾਰਜਾਂ ਨੂੰ ਵਿਕਸਤ ਕਰਨ ਲਈ ਪ੍ਰੋਗਰਾਮਿੰਗ, ਅਤੇ ਵੱਖ ਵੱਖ ਦੇ ਰਿਮੋਟ ਕੰਟਰੋਲ ਨੂੰ ਅਨੁਭਵ ਕਰੋ
ਸੀ ਐਨ ਸੀ ਸਿਸਟਮ ਤੇ ਕੰਮ; ਇਹ ਵਿਕਸਤ ਕਰਨ ਲਈ ਉਪਭੋਗਤਾ ਦੁਆਰਾ ਪ੍ਰਭਾਸ਼ਿਤ ਪ੍ਰੋਗਰਾਮਿੰਗ ਦਾ ਸਮਰਥਨ ਕਰਦਾ ਹੈ
ਲਾਈਟ ਲਾਈਟਾਂ ਨੂੰ ਬੰਦ ਕਰਨ ਅਤੇ ਬੰਦ ਕਰਨ ਲਈ, ਅਤੇ ਸਿਸਟਮ ਸਥਿਤੀ ਦੇ ਗਤੀਸ਼ੀਲ ਪ੍ਰਦਰਸ਼ਨੀ ਨੂੰ ਮਹਿਸੂਸ ਕਰੋ;
ਰਿਮੋਟ ਕੰਟਰੋਲ ਰੀਚਾਰਜਯੋਗ ਬੈਟਰੀ ਦੇ ਨਾਲ ਆਉਂਦਾ ਹੈ ਅਤੇ ਟਾਈਪ-ਸੀ ਦਾ ਸਮਰਥਨ ਕਰਦਾ ਹੈ
ਇੰਟਰਫੇਸ ਚਾਰਜਿੰਗ.
2.ਉਤਪਾਦ ਦੀਆਂ ਵਿਸ਼ੇਸ਼ਤਾਵਾਂ
1. 433MHz ਵਾਇਰਲੈੱਸ ਸੰਚਾਰ ਟੈਕਨੋਲੋਜੀ ਦੀ ਵਰਤੋਂ ਕਰਨਾ, ਵਾਇਰਲੈੱਸ ਓਪਰੇਸ਼ਨ
ਦੂਰੀ ਹੈ 80 ਮੀਟਰ;
2.ਆਟੋਮੈਟਿਕ ਬਾਰੰਬਾਰਤਾ ਹੋਪਿੰਗ ਫੰਕਸ਼ਨ ਦੀ ਵਰਤੋਂ ਕਰਨਾ, 32 ਵਾਇਰਲੈਸ ਰਿਮੋਟ ਦੇ ਸੈੱਟ
ਨਿਯੰਤਰਣ ਕਰਨ ਵਾਲੇ ਇਕ ਦੂਜੇ 'ਤੇ ਵਰਤੇ ਜਾ ਸਕਦੇ ਹਨ;
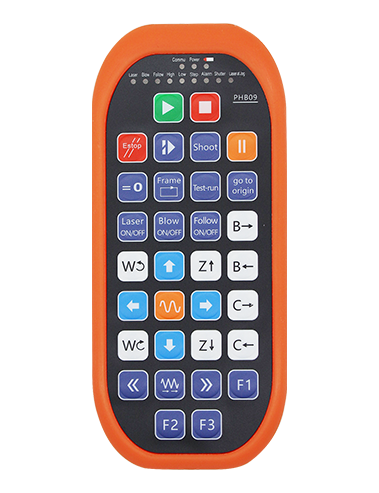
3.ਸਹਾਇਤਾ 32 ਕਸਟਮ ਬਟਨ ਪ੍ਰੋਗਰਾਮਿੰਗ;
4.ਸਹਾਇਤਾ 9 ਕਸਟਮ LED ਲਾਈਟ ਡਿਸਪਲੇਅ ਪ੍ਰੋਗਰਾਮਿੰਗ;
5.ਆਈਪੀ 67 ਵਾਟਰਪ੍ਰੂਫ ਲੈਵਲ ਦਾ ਸਮਰਥਨ ਕਰੋ;
6.ਸਟੈਂਡਰਡ ਟਾਈਪ-ਸੀ ਇੰਟਰਫੇਸ ਚਾਰਜ ਕਰੋ; 5ਵੀ -2 ਏ ਚਾਰਜਿੰਗ ਨਿਰਧਾਰਨ;
1100 ਮਾਹ ਵੱਡੀ ਸਮਰੱਥਾ ਵਾਲੀ ਬੈਟਰੀ, ਆਟੋਮੈਟਿਕ ਨੀਂਦ ਸਟੈਂਡਬਾਈ ਫੰਕਸ਼ਨ ਦੇ ਨਾਲ; ਅਹਿਸਾਸ ਕਰੋ
ਅਲਟਰਾ-ਲੌਂਗ ਘੱਟ ਪਾਵਰ ਸਟੈਂਡਬੀ;
7.ਸ਼ਕਤੀ ਦੇ ਅਸਲ-ਸਮੇਂ ਪ੍ਰਦਰਸ਼ਨੀ ਦਾ ਸਮਰਥਨ ਕਰੋ.
3.ਅਤੇ ਕੇਬਲ ਡਰੈਗਿੰਗ ਅਤੇ ਤੇਲ ਦੇ ਧੱਬੇ ਵਰਗੀਆਂ ਅਸੁਵਿਧਾਵਾਂ ਤੋਂ ਬਚਿਆ ਜਾਂਦਾ ਹੈ

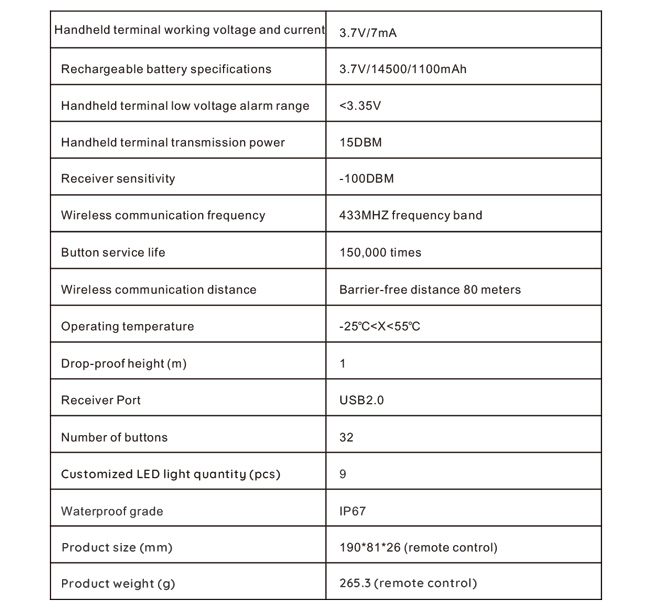
4. ਉਤਪਾਦ ਨਿਰਧਾਰਨ
5.ਉਤਪਾਦ ਫੰਕਸ਼ਨ ਜਾਣ ਪਛਾਣ
ਨੋਟਸ:
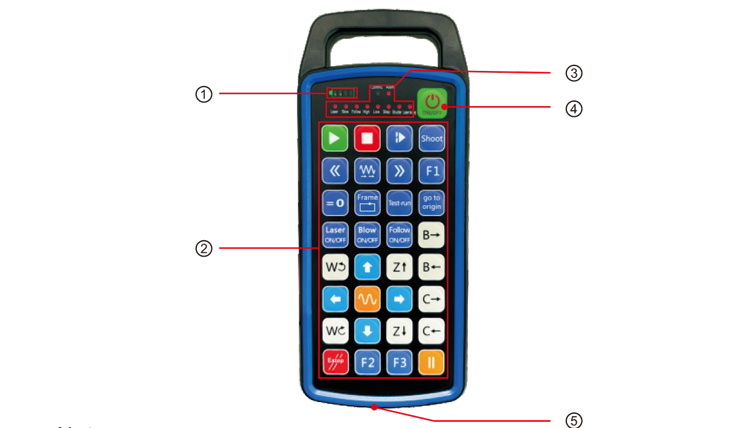
ਸਟ੍ਰਿਸਟਰੀ ਪੱਧਰ ਦਾ ਡਿਸਪਲੇਅ:
'ਤੇ ਪਾਵਰ ਤੋਂ ਬਾਅਦ ਲਾਈਟਾਂ, ਬੰਦ ਕਰਨ ਤੋਂ ਬਾਅਦ ਬੰਦ ਹੋ ਜਾਂਦਾ ਹੈ;
ਜੇ ਬੈਟਰੀ ਇੰਡੀਕੇਟਰ ਲਾਈਟ ਸਿਰਫ ਇਕ ਬਾਰ ਹੈ ਅਤੇ ਚਮਕਦੀ ਰਹਿੰਦੀ ਹੈ, ਇਸਦਾ ਅਰਥ ਹੈ
ਬੈਟਰੀ ਬਹੁਤ ਘੱਟ ਹੈ. ਕਿਰਪਾ ਕਰਕੇ ਬੈਟਰੀ ਬਦਲੋ;
ਜੇ ਬੈਟਰੀ ਇੰਡੀਕੇਟਰ ਲਾਈਟਾਂ ਸਾਰੇ ਚੱਲ ਰਹੀਆਂ ਹਨ ਅਤੇ ਹੋਰ ਐਲਈਡੀ ਲਾਈਟਾਂ ਪਿਛਲੇ ਪਾਸੇ ਫਲੈਸ਼ ਹੁੰਦੀਆਂ ਹਨ ਅਤੇ
ਅੱਗੇ, ਇਸਦਾ ਅਰਥ ਹੈ ਕਿ ਬੈਟਰੀ ਬਹੁਤ ਘੱਟ ਹੈ. ਕਿਰਪਾ ਕਰਕੇ ਬੈਟਰੀ ਬਦਲੋ;
ਜੇ ਬੈਟਰੀ ਇੰਡੀਕੇਟਰ ਰੋਸ਼ਨੀ ਨਹੀਂ ਕਰਦਾ ਜਾਂ ਬਾਹਰ ਨਹੀਂ ਜਾਂਦਾ, ਅਤੇ ਡਿਵਾਈਸ ਨਹੀਂ ਹੋ ਸਕਦੀ
ਪਾਵਰ ਬਟਨ ਦਬਾ ਕੇ ਅਤੇ ਹੋਲਡ ਕਰਕੇ ਅਰੰਭ ਕੀਤਾ ਗਿਆ, ਕਿਰਪਾ ਕਰਕੇ ਬੈਟਰੀ ਬਦਲੋ;
②ਬੱਟਨ ਏਰੀਆ:32 ਬਟਨ 4x8 ਵਿੱਚ ਪ੍ਰਬੰਧਿਤ, ਉਪਭੋਗਤਾ ਦੁਆਰਾ ਪ੍ਰਭਾਸ਼ਿਤ ਪ੍ਰੋਗਰਾਮਿੰਗ;
③status ਅਗਵਾਈ:
ਕਾਮੂ: ਬਟਨ ਸੰਕੇਤਕ ਰੋਸ਼ਨੀ, lights up when the button is pressed and goes
out when the button is released; other lights are custom displays;
④Power switch:
Long press for 3 seconds to turn on, long press for 3 seconds to turn off;
⑤Charging port:
Use Type-C charger to charge, charging voltage 5V, current 1A-2A; charging
time 3-5 ਘੰਟੇ;
When charging, the power indicator flashes, indicating that it is charging. When
fully charged, the power indicator will show full bar without flashing.
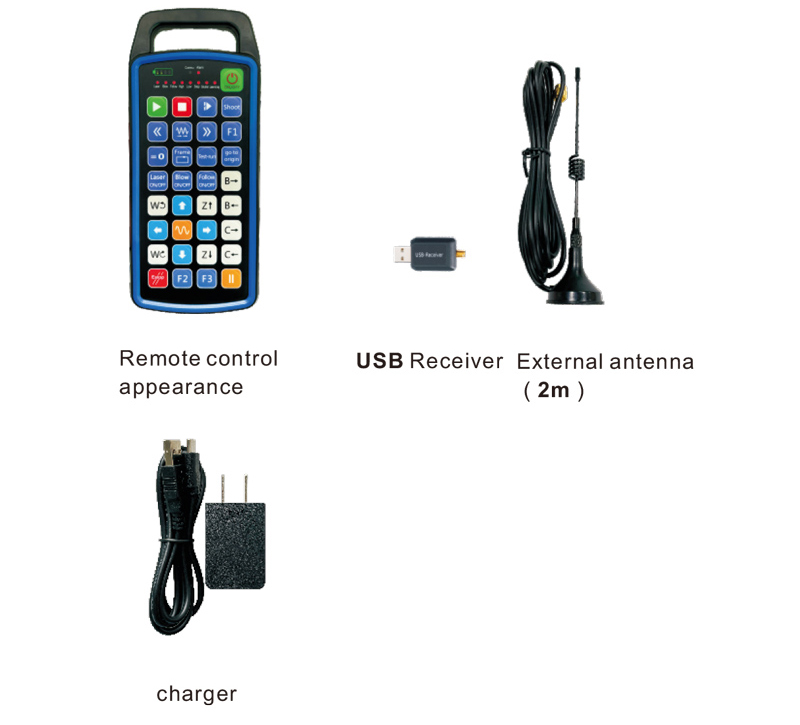
6.ਉਤਪਾਦ ਸਹਾਇਕ ਉਪਕਰਣ
7.Product Installation Guide
1 . I nsert the USB receiver into the computer, the computer will automatically
recognize and install the USB device driver without manual
2. Insert the remote control into the charger. After the battery is fully charged, press
and hold the power button for 3 seconds. The remote control will turn on and the power
indicator will light up, ਇਹ ਦਰਸਾਉਂਦਾ ਹੈ ਕਿ ਪਾਵਰ-ਆਨ ਸਫਲ ਹੈ.
3. ਦੀ ਸ਼ਕਤੀ ਦੇ ਬਾਅਦ, ਤੁਸੀਂ ਕੋਈ ਵੀ ਬਟਨ ਕਾਰਵਾਈ ਕਰ ਸਕਦੇ ਹੋ. ਰਿਮੋਟ ਕੰਟਰੋਲ
ਇਕੋ ਸਮੇਂ ਡਿ ual ਲ ਬਟਨ ਦੇ ਕੰਮ ਨੂੰ ਸਹਾਇਤਾ ਕਰ ਸਕਦਾ ਹੈ. ਜਦੋਂ ਤੁਸੀਂ ਕੋਈ ਵੀ ਬਟਨ ਦਬਾਉਂਦੇ ਹੋ, ਦੀ
ਰਿਮੋਟ ਕੰਟਰੋਲ 'ਤੇ ਕਮਾਨ ਨੂੰ ਪ੍ਰਕਾਸ਼ਮਾਨ ਕਰ ਦੇਵੇਗਾ, ਇਹ ਸੰਕੇਤ ਯੋਗ ਹੈ ਕਿ ਇਹ ਬਟਨ ਜਾਇਜ਼ ਹੈ.
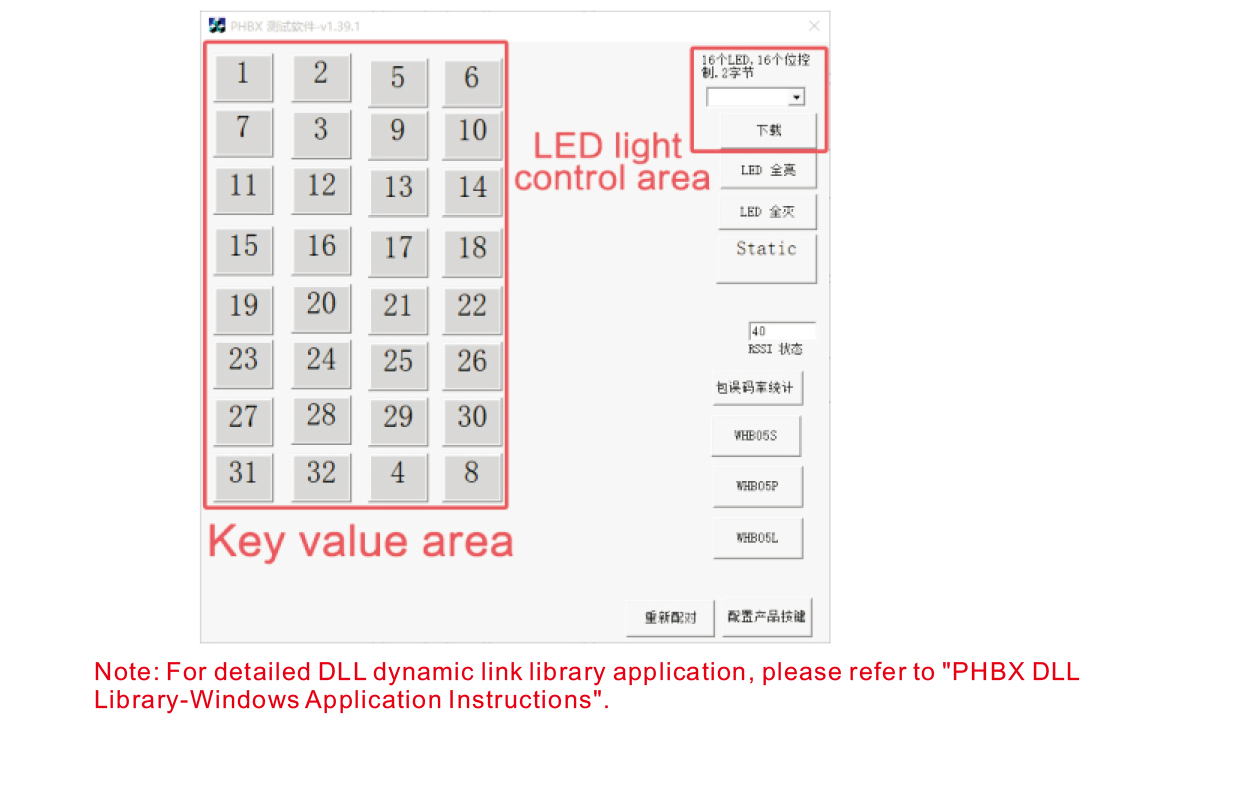
8.ਉਤਪਾਦ ਓਪਰੇਸ਼ਨ ਨਿਰਦੇਸ਼
ਉਤਪਾਦ ਵਿਕਾਸ ਅਤੇ ਵਰਤੋਂ ਤੋਂ ਪਹਿਲਾਂ, ਤੁਸੀਂ ਡੈਮੋ ਸਾੱਫਟਵੇਅਰ ਦੀ ਵਰਤੋਂ ਕਰ ਸਕਦੇ ਹੋ ਜੋ ਅਸੀਂ ਪ੍ਰਦਾਨ ਕਰਦੇ ਹਾਂ
ਰਿਮੋਟ ਕੰਟਰੋਲ ਤੇ ਬਟਨਾਂ ਅਤੇ ਰਿਮੋਟ ਕੰਟਰੋਲ ਤੇ ਬਟਨਾਂ ਦੀ ਜਾਂਚ ਕਰੋ. ਤੁਸੀਂ ਕਰ ਸੱਕਦੇ ਹੋ
ਭਵਿੱਖ ਦੇ ਪ੍ਰੋਗਰਾਮਿੰਗ ਵਿਕਾਸ ਲਈ ਸੰਦਰਭ ਰੁਟੀਨ ਵਜੋਂ ਡੈਮੋ ਦੀ ਵਰਤੋਂ ਵੀ ਕਰੋ.
ਡੈਮੋ ਸਾੱਫਟਵੇਅਰ ਦੀ ਵਰਤੋਂ ਕਰਨ ਤੋਂ ਪਹਿਲਾਂ, ਕਿਰਪਾ ਕਰਕੇ ਕੰਪਿ into ਟਰ ਵਿੱਚ USB ਰਿਸੀਵਰ ਨੂੰ ਜੋੜੋ,
ਇਹ ਸੁਨਿਸ਼ਚਿਤ ਕਰੋ ਕਿ ਰਿਮੋਟ ਕੰਟਰੋਲਰ ਦੀ ਕਾਫ਼ੀ ਸ਼ਕਤੀ ਹੈ, ਟੀ ਨੂੰ ਪਾਵਰ ਬਟਨ ਦਬਾਓ ਅਤੇ ਹੋਲਡ ਕਰੋ
ਇਸ 'ਤੇ ਯੂ, ਅਤੇ ਫਿਰ ਇਸ ਦੀ ਵਰਤੋਂ ਕਰੋ;
ਜਦੋਂ ਰਿਮੋਟ ਕੰਟਰੋਲ 'ਤੇ ਕੋਈ ਵੀ ਬਟਨ ਦਬਾਇਆ ਜਾਂਦਾ ਹੈ, the test software demo will display
the corresponding key value. After releasing it, the key value display disappears,
indicating that the key upload is normal;
You can also select the LED light number on the test software demo, click download,
and the corresponding light number on the remote control will light up, indicating that the
LED light is downloading normally.
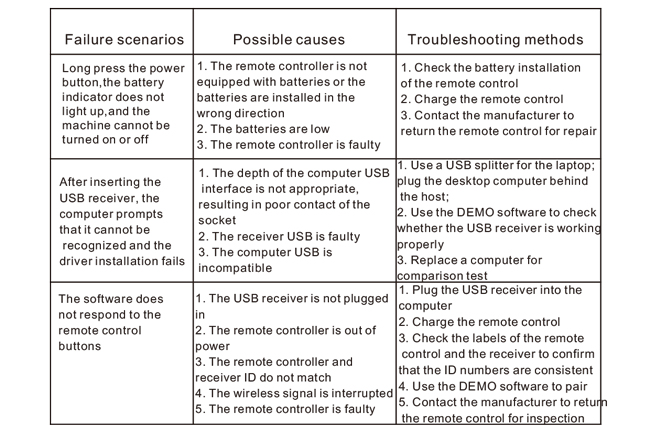
9.Product Troubleshooting
10. Maintenance and care
1. Please use it in a dry environment with normal temperature and pressure to extend
the service life;
2. Do not use sharp objects to touch the key area to extend the service life of the key;
3. Please keep the key area clean to reduce key wear;
4. Avoid squeezing and falling to cause damage to the remote control;
5. If not used for a long time, please remove the battery and store the remote control
and battery in a clean and safe place;
6. Pay attention to moisture-proof during storage and transportation.
11.Safety Information
1. Please read the instructions carefully before use. Non-professionals are prohibited from
operating.
2. Please use the original charger or a charger produced by a regular manufacturer with the
same specifications.
3. Please charge in time to avoid incorrect operation due to insufficient power causing the
remote control to be unresponsive.
4. If repair is required, please contact the manufacturer. If the damage is caused by self-repair,
the manufacturer will not provide warranty.