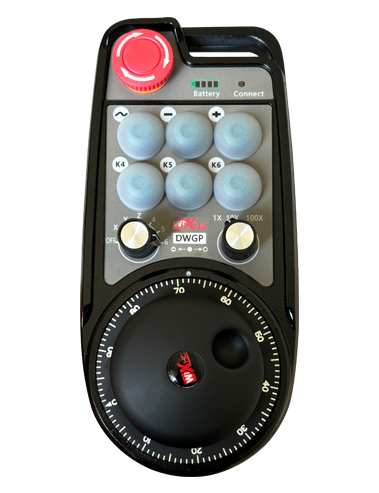
Suporta 32 custom button programming
Suporta 9 custom LED light display programming
Using 433MHZ wireless communication technology, the wireless operation
distance is 80 metro
£300.00
Suporta 32 custom button programming
Suporta 9 custom LED light display programming
Using 433MHZ wireless communication technology, the wireless operation
distance is 80 metro
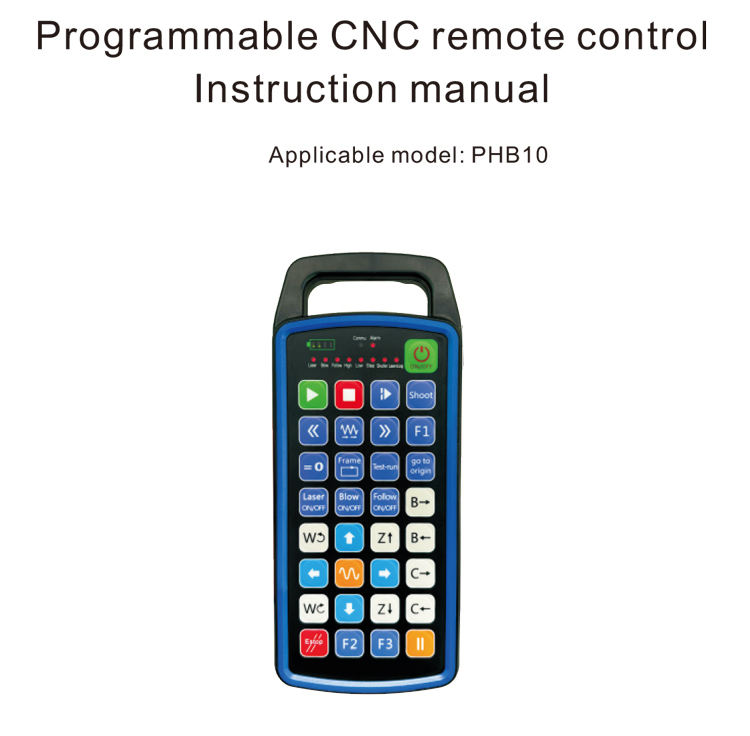
1.Product Introduction
The programmable CNC remote control PHB10 is suitable for wireless
remote control operation of various CNC systems. It supports user-defined
programming to develop button functions, and realize remote control of various
functions on the CNC system; it supports user-defined programming to develop
LED lights to light up and turn off, and realize dynamic display of system status;
the remote control comes with a rechargeable battery and supports Type-C
interface charging.
2.Mga Tampok ng Produkto
1. Using 433MHZ wireless communication technology, the wireless operation
distance is 80 metro;
2.Using automatic frequency hopping function, 32 sets of wireless remote
controllers can be used at the same time without affecting each other;
3.Suporta 32 custom button programming;
4.Suporta 9 custom LED light display programming;
5.Support IP67 waterproof level;
6.Support standard Type-C interface charging; 5V-2A charging specification;
1100 mAh large capacity battery, with automatic sleep standby function; realize
ultra-long low power standby;
7.Support real-time display of power.
3.Paggawa ng prinsipyo

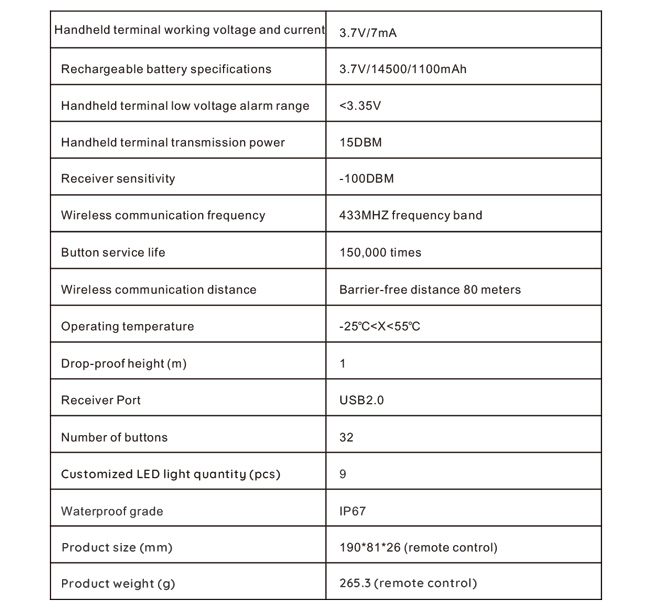
4. Product specifications
5.Product function introduction
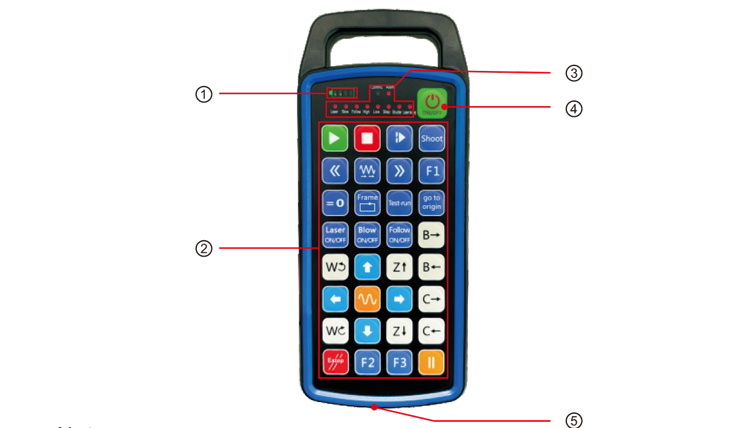
Notes:
①Battery level display:
Lights up after power on, turns off after power off;
If the battery indicator light is only one bar and keeps flashing, it means the
battery is too low. Please replace the battery;
If the battery indicator lights are all on and the other LED lights flash back and
forth, it means the battery is very low. Please replace the battery;
If the battery indicator does not light up or go out, and the device cannot be
started by pressing and holding the power button, palitan mo na lang ng battery;
(2)Lugar ng butones:32 mga pindutan na nakaayos sa 4X8, programming na tinukoy ng gumagamit;
(3)Status LED:
COMMU: Button indicator light, umiilaw kapag pinindot ang pindutan at napupunta
out kapag ang pindutan ay inilabas; iba pang mga ilaw ay pasadyang mga display;
(4) Power switch:
Mahabang pindutin para sa 3 segundo upang buksan, mahabang pindutin para sa 3 segundo para patayin;
(5)Charging port:
Gumamit ng Type-C charger para maningil, boltahe ng pagsingil 5V, kasalukuyang 1A-2A; pag charge ng
oras na 3-5 oras;
Kapag nagcha charge, ang power indicator ay kumikislap, na nagpapahiwatig na ito ay naniningil. Kapag
ganap na sinisingil, ang power indicator ay magpapakita ng full bar nang walang flashing.
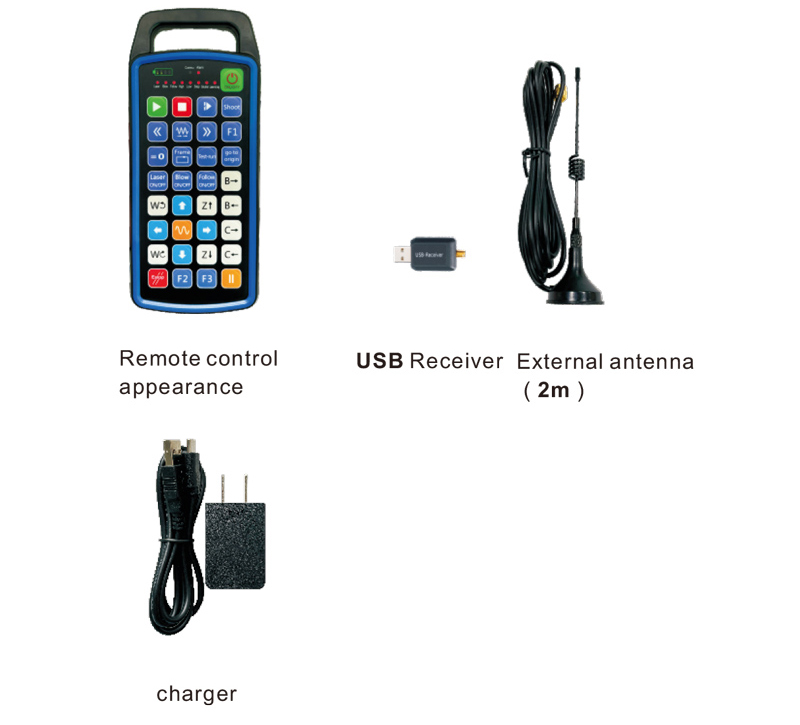
6.diagram ng mga accessory ng produkto
7.Gabay sa Pag install ng Produkto
1 . I nsert ang USB receiver sa computer, ang computer ay awtomatikong
kilalanin at i install ang USB device driver nang walang manu manong
2. Ipasok ang remote control sa charger. Pagkatapos ng baterya ay ganap na na charge, press
and hold the power button for 3 seconds. The remote control will turn on and the power
indicator will light up, indicating that the power-on is successful.
3. After powering on, you can perform any button operation. The remote control
can support dual button operation at the same time. When you press any button, ang
COMMU light on the remote control will light up, indicating that this button is valid.
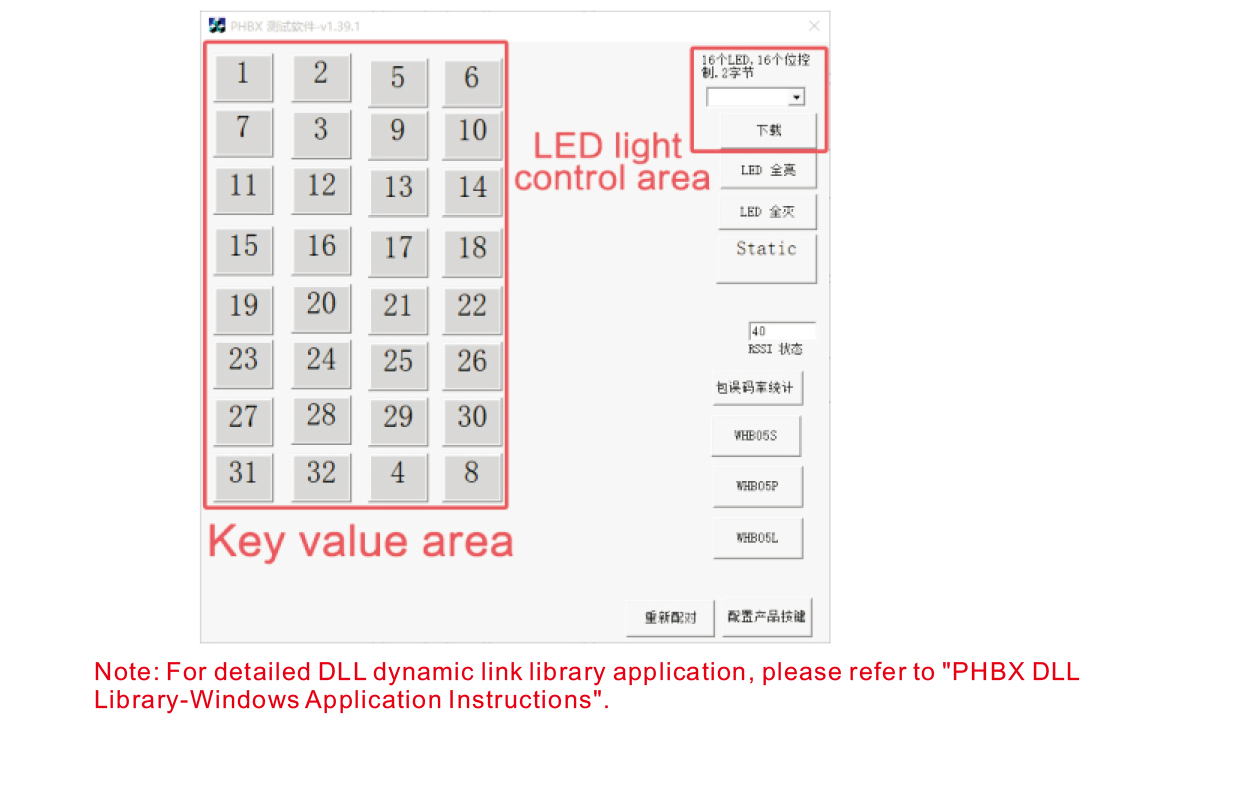
8.Product Operation Instructions
Before product development and use, you can use the demo software we provide to
test the buttons on the remote control and the LED light on the remote control. You can
also use the demo as a reference routine for future programming development.
Before using the Demo software, please plug the USB receiver into the computer,
make sure the remote controller has sufficient power, pindutin nang matagal ang power button sa t
urn ito sa, at pagkatapos ay gamitin ito;
Kapag ang anumang pindutan sa remote control ay pinindot, ang test software demo ay magpapakita
ang kaukulang halaga ng susi. Pagkatapos ilabas ito, ang key value display ay nawawala,
na nagpapahiwatig na ang key upload ay normal;
Maaari mo ring piliin ang numero ng ilaw ng LED sa demo ng software ng pagsubok, click ang download,
at ang kaukulang light number sa remote control ay mag iilaw, na nagpapahiwatig na ang
Ang LED light ay normal na nagda download.
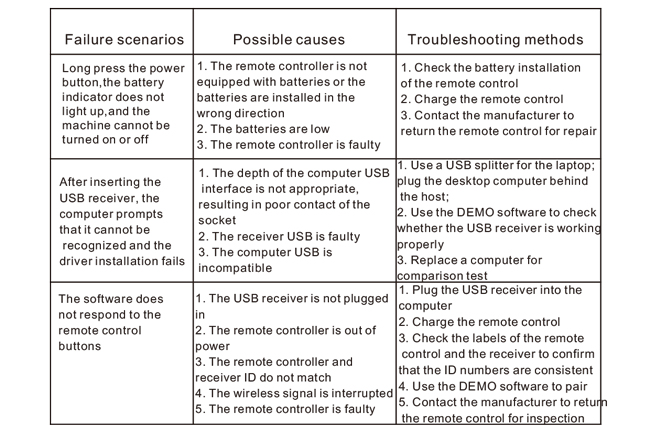
9.Pag troubleshoot ng Produkto
10. Pagpapanatili at pangangalaga
1. Mangyaring gamitin ito sa isang tuyong kapaligiran na may normal na temperatura at presyon upang mapalawak
ang buhay ng serbisyo;
2. Huwag gumamit ng matatalim na bagay upang hawakan ang key area upang palawigin ang buhay ng serbisyo ng susi;
3. Mangyaring panatilihin ang key area malinis upang mabawasan ang key wear;
4. Iwasan ang pagpiga at pagbagsak upang maging sanhi ng pinsala sa remote control;
5. Kung hindi gagamitin nang matagal, alisin mo na lang ang battery at itago mo na ang remote control
at baterya sa isang malinis at ligtas na lugar;
6. Bigyang pansin ang kahalumigmigan sa panahon ng imbakan at transportasyon.
11.Impormasyon sa Kaligtasan
1. Mangyaring basahin nang mabuti ang mga tagubilin bago gamitin. Bawal ang mga hindi propesyonal sa
Pagpapatakbo.
2. Mangyaring gamitin ang orihinal na charger o isang charger na ginawa ng isang regular na tagagawa kasama ang
parehong mga pagtutukoy.
3. Mangyaring singilin sa oras upang maiwasan ang maling operasyon dahil sa hindi sapat na kapangyarihan na nagiging sanhi ng
remote control upang maging hindi tumutugon.
4. Kung kinakailangan ang pag aayos, Mangyaring makipag ugnay sa tagagawa. Kung ang pinsala ay sanhi ng pag aayos ng sarili,
ang tagagawa ay hindi magbibigay ng warranty.