Kuvaus
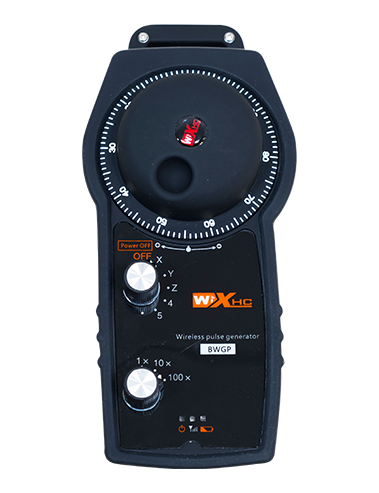
Tuotteen malli
Malli: DH12S-LD
Soveltuvat varusteet:telaketjusahakone
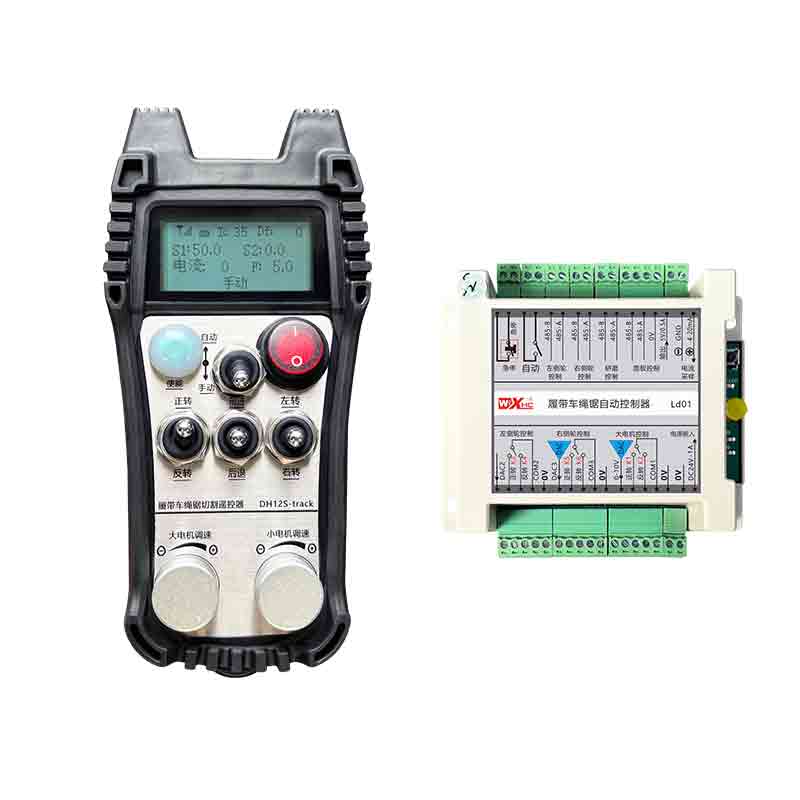
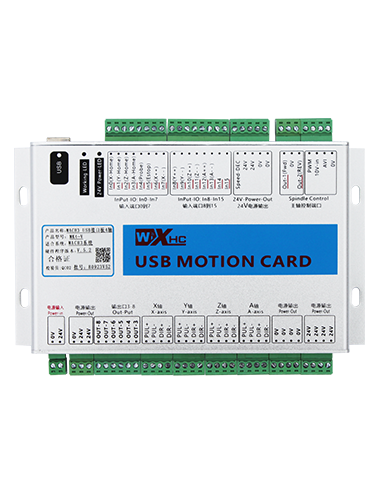
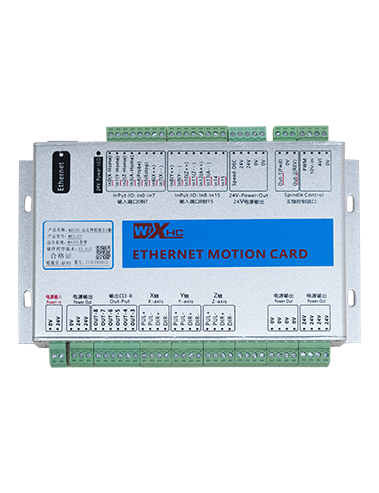
Tuotteen lisävarustekaavio
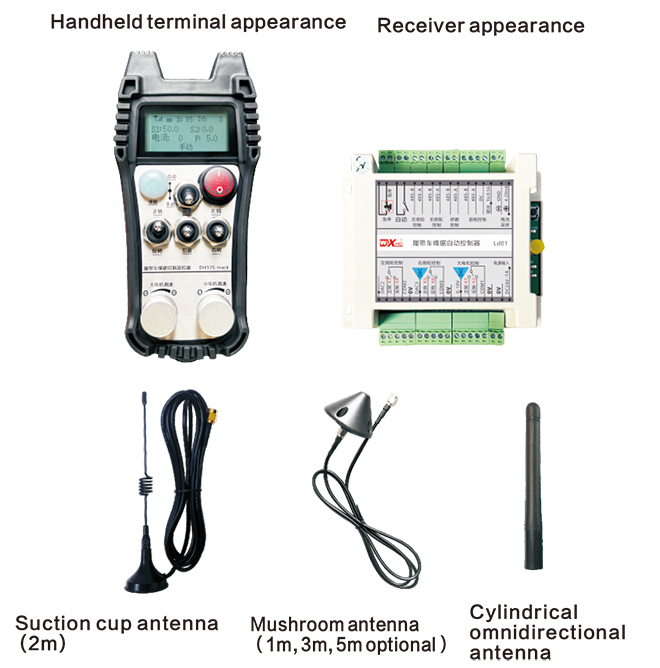
Huomautus: Voit valita yhden kolmesta antennista. Imukuppiantenni on oletuksena vakiona.
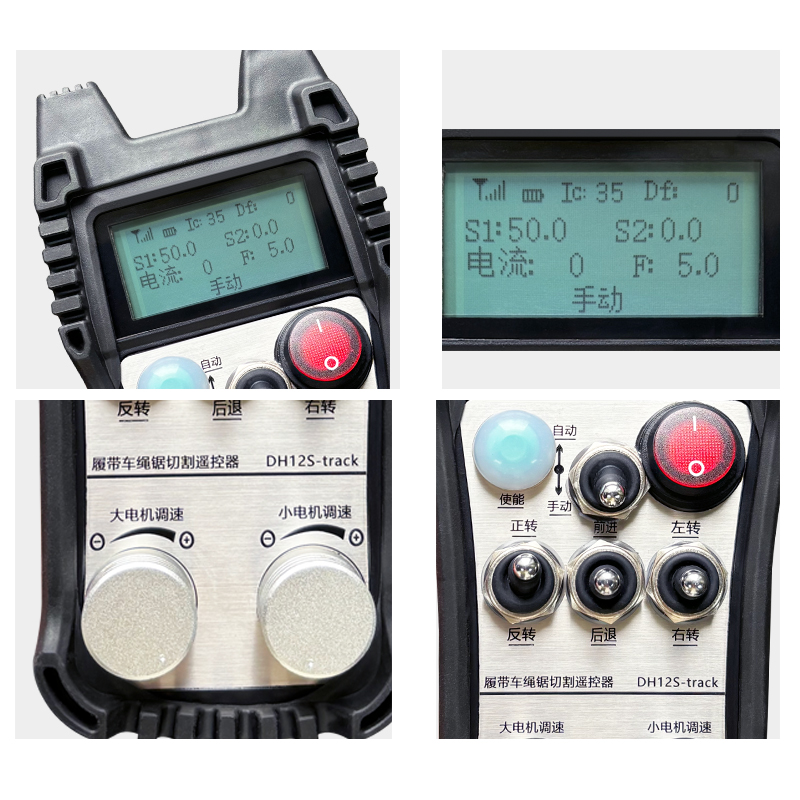
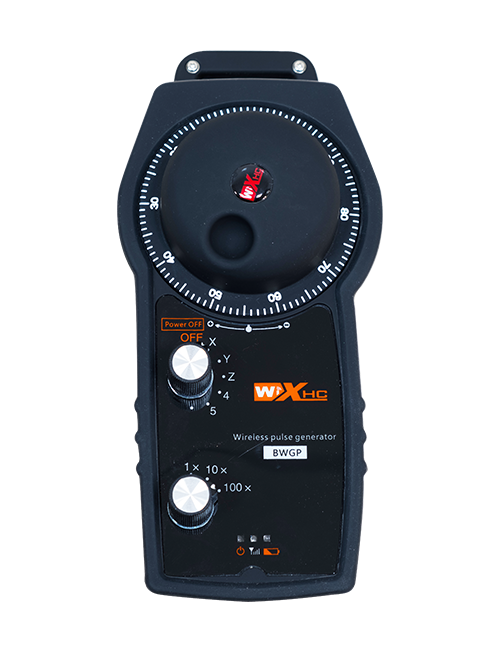
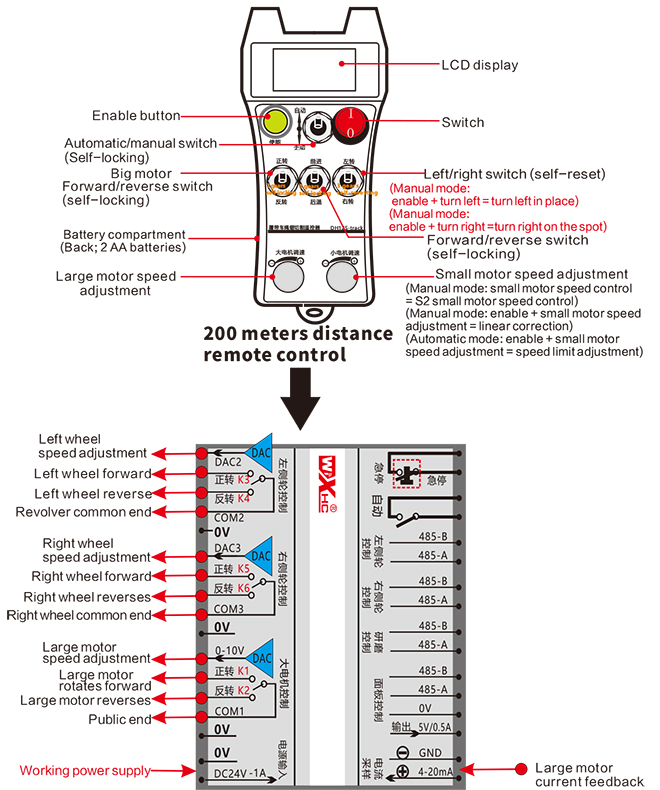
Kaukosäätimen kytkimen kuvaus
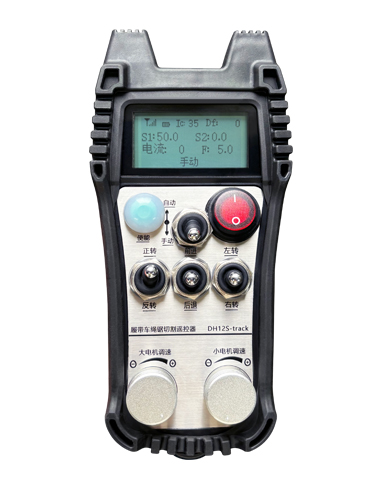
Näytön sisällön esittely

Suuri moottorin nopeus:S1:0-50
Pieni moottorin nopeus: S2: 0-50
Automaattisen leikkauspienmoottorin maksiminopeusrajoitus:F:0-30(parametrit säädettävissä)
Automaattinen leikkaus maksimivirta: Ic: 0-35 (parametrit säädettävissä)
Lineaarinen korjausarvo: Df: -99-99 (1 yksikkö on noin 0,02V)

Pieni jännite: Kaukosäätimen paristo on liian alhainen, vaihda akku.

Verkko katkesi: Langaton signaali katkeaa. Tarkista vastaanottimen teho, käynnistä se uudelleen, ja käynnistä kaukosäädin uudelleen.
Kaukosäätimen toimintojen käyttöohjeet
1.Kytke kaukosäädin päälle
Kun virta on päällä, vastaanottimen RF-LED-valo alkaa vilkkua;asenna kaksi AA-paristoa vastaanottimeen e, kytke virtakytkin päälle, ja näytössä näkyy moottorin nopeus, osoittaa onnistuneen käynnistyksen.
2.Suuri moottori ja nopeudensäätö
Käännä “eteen/taakse” vaihtaa eteenpäin, vastaanottimen iso moottori käynnistyy, ja näytössä näkyy eteenpäin
Käännä “eteen/taakse” vaihtaa taaksepäin, vastaanottimen suuri moottori käynnistyy taaksepäin, ja näytössä näkyy käänteinen
Kierrä “suuri moottorin nopeuden säätö” nuppi vastaanottimen suuren moottorin nopeudensäädön lähtöjännitteen säätämiseksi 0-10V;
3.Pieni moottori ja nopeudensäätö
Siirrä “eteen/taakse” vaihtaa eteenpäin, vastaanottimen vasen pyörä eteenpäin ja oikea pyörä eteenpäin ovat päällä, ja näytössä näkyy eteenpäin
Käännä “Eteen/taakse” vaihtaa taaksepäin, vastaanottimen vasen pyörän peruutus ja oikea pyörän peruutus on kytketty päälle, ja näytössä näkyy taaksepäin
4.Käänny vasemmalle ja oikealle
Käännä “Vasen/Oikea” vaihda vasemmalle, vastaanottimen oikea pyörä siirtyy eteenpäin ja käynnistyy,ja näyttö näkyy vasemmalla
Käännä “käänny vasemmalle/oikealle” vaihtaa oikealle, vastaanottimen vasen pyörä siirtyy eteenpäin ja käynnistyy, ja näytössä näkyy käänny oikealle
5.Käännä paikalleen
Manuaalitilassa:
Käänny vasemmalle paikalleen: Paina ja pidä painettuna “Ota käyttöön” -painiketta, käännä “Käänny vasemmalle/oikealle” vaihda vasemmalle, vastaanottimen vasen pyörä taaksepäin ja oikea pyörä eteenpäin on kytketty päälle,ja ala kääntyä vasemmalle paikalleen;
Käänny oikealle paikalleen: Paina ja pidä painettuna “Ota käyttöön” -painiketta, käännä “Käänny vasemmalle/oikealle” vaihtaa oikealle, vastaanottimen vasen pyörä eteenpäin ja oikea pyörä taaksepäin on kytketty päälle, ja vastaanotin alkaa kääntyä oikealle paikalleen;
6.Pienen moottorin nopeusrajoituksen säätö
Automaattisessa tilassa: paina ja pidä painettuna “Ota käyttöön” -painiketta ja käännä “Pienen moottorin nopeuden säätö” säätääksesi pienen moottorin maksiminopeutta automaattisen leikkauksen aikana;
7.Automaattinen leikkaus
Ensimmäinen askel on käynnistää iso moottori; toinen vaihe on vaihtaa tilakytkin asentoon “Auto”; Kolmas vaihe on käynnistää pieni moottori ja näyttö tulee näkyviin “Automaattinen leikkaus”,osoittaa, että se on siirtynyt automaattiseen leikkaustilaan;
8. Suoran viivan korjaus
Kun vasen ja oikea kävelymoottori liikkuvat eteenpäin ja taaksepäin, vasen ja oikea nopeus ovat epäyhtenäiset, ja suora kävely poikkeaa. Voit käyttää kaukosäätimen lineaarista korjaustoimintoa vasemman ja oikean pyörän nopeuden hienosäätämiseen;
Korjausperiaate: Korjaustoiminnon kautta, vasemman pyörän nopeus on hienosäädetty saavuttamaan sama nopeus kuin oikean pyörän, jotta voidaan synkronoida vasemman ja oikean pyörän nopeus ja poistaa poikkeama;
Poikkeaman korjausmenetelmä: Manuaalitilassa, paina ja pidä painettuna “Ota käyttöön” -painiketta ja käännä “Pienen moottorin nopeudensäätö”;
Kierrä myötäpäivään lisätäksesi vasemman pyörän nopeuden jännitettä ja näytön korjausarvo kasvaa;
Kierrä vastapäivään vähentääksesi vasemman pyörän nopeusjännitettä ja näytön korjausarvoa pienentääksesi;
Korjausalue: Korjausarvo -90 -lla 90; Yhden korjausyksikön korjausjännite on noin 0,02V;
9. Parametrivalikko (käyttäjiä ei saa muuttaa ilman lupaa)
Joitakin kaukosäätimen toimintoja voidaan säätää parametreilla. Manuaalitilassa, kun moottorin pieni nopeus S2 on 10, paina eteenpäin/taakse-kytkintä ylös kolme kertaa peräkkäin, ja paina sitä sitten alas kolme kertaa peräkkäin päästäksesi parametrivalikkoon;
Poistu parametrivalikosta: valitse tallentaako vai ei, vahvista sitten poistuminen painamalla käynnistyspainiketta;
Enimmäisvirta: leikkausmoottorin nimellisvirta on 80% tästä virrasta;
Nopeuden hallintaparametrit: automaattiset leikkauksen ohjausparametrit, laiminlyönti 800, muuttaminen on kielletty;
Hidastusparametri: automaattinen leikkausohjausparametri. Kun leikkausvirran muutosarvo ylittää tämän arvon,hidastus alkaa.
Kiihtyvyys A1: automaattinen leikkausohjausparametri, kun leikkausvirta on pienempi kuin asetettu leikkausvirta, kiihtyvyyden nopeus;
Hidastuvuus A2: automaattinen leikkausohjausparametri, kun leikkausvirta on asetettua suurempi
leikkausvirta, hidastusnopeus;
Automaattinen veitsen sisäänveto: virheellinen;
Aloita itselukin: 0, ei itselukittuvaa; 1, itselukittuva. Paina käynnistysnäppäintä + eteen- ja taaksepäin aktivoidakseen ja lukituttaakseen itsensä.
Enimmäiskävely: pienen moottorin maksiminopeus.
Leikkausvirta: aseta päämoottorin maksimivirta automaattista leikkausta varten. Jos takaisinkytkentävirta ylittää tämän arvon, se alkaa hidastua.
Oletuksena nopeusrajoitus: automaattisen leikkausnopeuden oletusarvoinen enimmäisnopeus, kun kone käynnistetään.
Automaattitila: 0, automaattinen kytkin ohjataan automaattisesti; 1, automaattinen kytkin ohjaa automaattista IO-lähtökohtaa.
Nopeusrajoitus korvaus: pienen moottorin maksiminopeus automaattisen leikkauksen aikana.
Isäntä: suuren moottorin maksiminopeus.
Kaukosäätimen sähköiset ominaisuudet

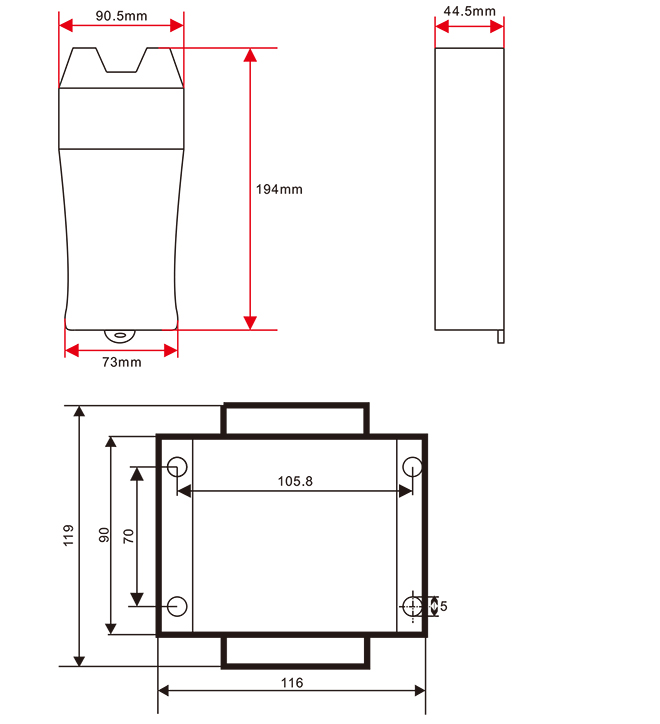
Kaukosäätimen koko
Tämän tuotteen lopullinen tulkintaoikeus kuuluu vain yrityksellemme.